Search Google

Tuesday, 20 January 2015

all about android studio and android design like facebook

 find your apk file in :-
AndroidStudioProjects\zoopmobile\app\build\outputs\apk

http://freebiesbug.com/psd-freebies/app-design/   PSD DESIGN

There are three ways to generate your build as per the buildType. (In your case, it's release but it can be named anything you want.)
  1. Go to Gradle Task in right panel of Android Studio and search for assembleRelease or assemble(#your_defined_buildtype) under Module Tasks
  2. Go to Build Variant in Left Panel and select the build from drop down
  3. Go to project root directory in File Explore and open cmd/terminal and run:
    Linux: ./gradlew assembleRelease or assemble(#your_defined_buildtype)
    Windows: gradlew assembleRelease or assemble(#your_defined_buildtype)
If you want to do a release build (only), you can use Build > Generate Signed apk. For other build types, only the above three options are available.
You can find the generated APK in your module/build directory having the build type name in it.
 ---------------------------------------------------------------------------------
You can use this code
android {
   ...
signingConfigs {
        release {
            storeFile file("../your_key_store_file.jks")
            storePassword "some_password"
            keyAlias "alias_name"
            keyPassword "key_password"
        }
    }

    buildTypes {

        release {
            signingConfig signingConfigs.release
        }
    }


   ...
}
then from your terminal run
gradle assembleRelease
you will get the apk at
your-android-app/build/outputs/apk/your-android-app-release.apk
Complete Tutorial -> How To Generate Signed APK with Gradle Task
----------------------------------------------------------------------------------------

Android Studio error installing Gradle


Please read the log from:
  • On Microsoft Windows: [Windwos Drive]\Documents and Settings\[your username]\.AndroidStudioPreview\system\log
  • On Mac and Linux: ~/.AndroidStudioPreview/system/log/
And you will find the tmp download path of gradle-1.6-bin.zip. For example, mine is:
2013-05-17 09:42:16,934 [ 283002]   INFO - ution.rmi.RemoteProcessSupport - Unzipping C:\Documents and Settings\Kiki.J.Hu\.gradle\wrapper\dists\gradle-1.6-bin\72srdo3a5eb3bic159kar72vok\gradle-1.6-bin.zip to C:\Documents and Settings\Kiki.J.Hu\.gradle\wrapper\dists\gradle-1.6-bin\72srdo3a5eb3bic159kar72vok 
...
Caused by: com.intellij.openapi.externalSystem.model.ExternalSystemException: Could not install Gradle distribution from 'http://services.gradle.org/distributions/gradle-1.6-bin.zip'.
java.util.zip.ZipException: error in opening zip file
So I know the cause: I downloaded an incomplete ZIP package.
Then I downloaded the full ZIP package from http://services.gradle.org/distributions/gradle-1.6-bin.zip manually and copied this ZIP package to:
  • Windows: C:\Documents and Settings\Kiki.J.Hu\.gradle\wrapper\dists\gradle-1.6-bin\72srdo3a5eb3bic159kar72vok\
  • Mac OS X: ~/.gradle/wrapper/dists/gradle-1.10-all/6vpvhqu0efs1fqmqr2decq1v12/
Everything is OK now.
 
 --------------------------------------------


How to include support library?
Another great thing that announced in Google I/O 2013 is ActionBar Compat. I’m waiting it for a long time, because using “Sherlock ActionBar” is a little bit complicated. And now it’s released. Download it with your SDK Manager.
Then include it in your project. How? Because this is Gradle-based, it’s quite simple. Open “build.gradle” in your main project folder.
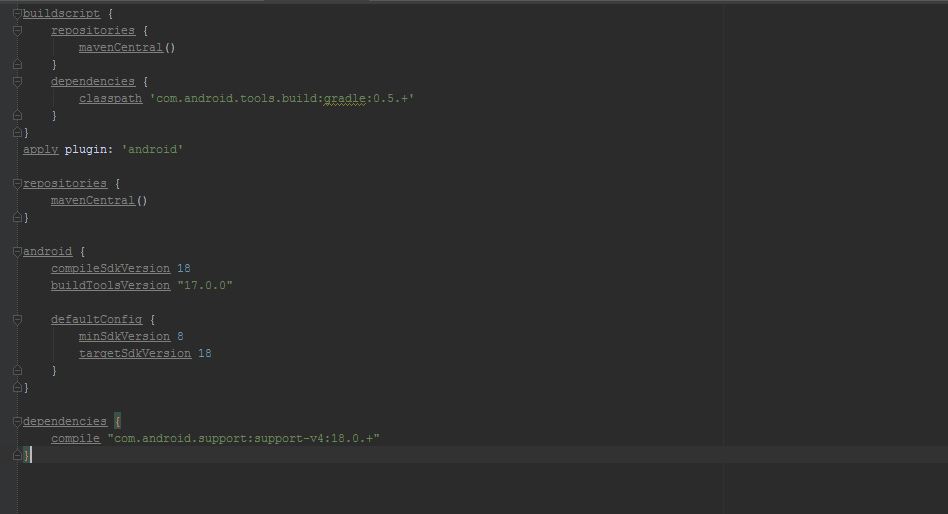
For Android-Support v4:
– It’s automatically included when you created new project. But if not, use second step.
– Add this line:
dependencies {
…
compile “com.android.support:support-v4:18.0.+”
}

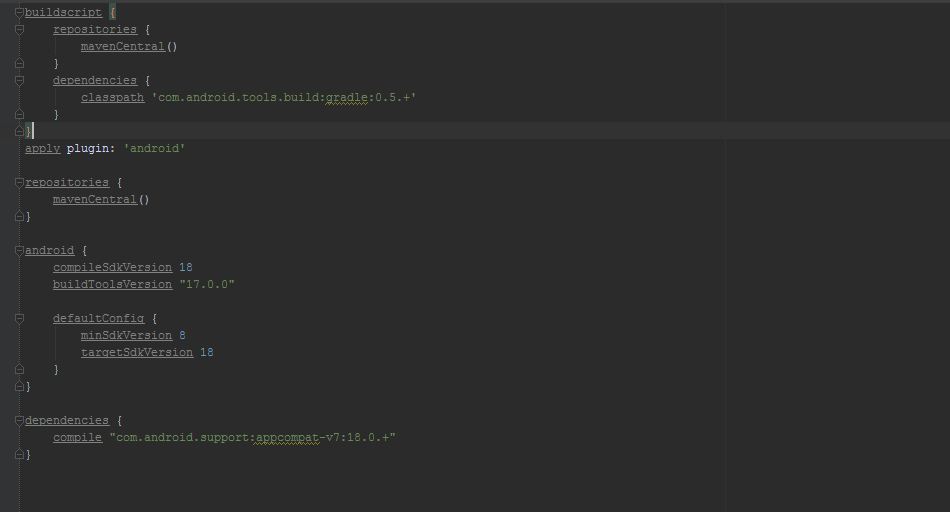
For Android-Support v7:
– Add this line:
dependencies {
…
compile “com.android.support:appcompat-v7:18.0.+”
}

How tot test your app?
Just like Eclipse, Android Studio support 2 way of testing. By using AVD (Android Virtual Devices) or by real devices. To edit configurations, go to “Run” -> “Edit Configurations”. I recommend you to choose “Target Device” -> “Show chooser dialog”, to give you more freedom in testing.
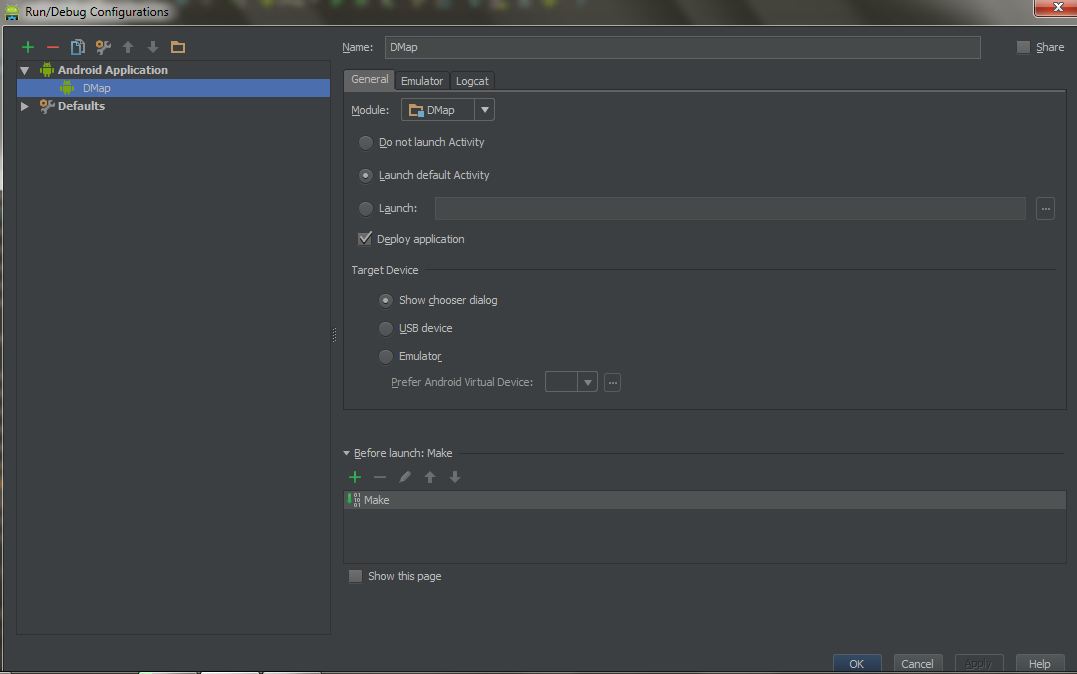
For AVD:
– You have to create at least one AVD. To create AVD, go to “Tools” -> “Android” -> “AVD Manager”
– In the chooser dialog, select AVD, and choose your devices.
For Real Device:
– You have to enable USB Debugging in your devices! Enable it, then go forward.
– Connect it through USB. In chooser dialog, you will see your device there.
Known issue: Sometimes the driver is not right. You should use Google USB Driver for testing app in Android. Or sometime, your device won’t be detected if it’s in sleep/locked mode.

How to generate a signed APK?
This is also easy! Android Studio is provided with App-signing capability so you don’t have to open up your keytool or do somewhat-complicated task.
Here’s some steps:
– Go to “Build” -> “Generate Signed APK…”
– Click “Create new…”
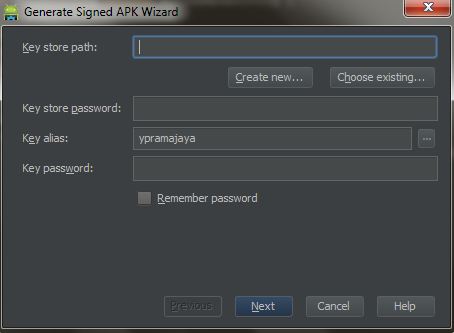
– To make a new keystore, just put a non-exist keystore in “Key store path:” (The folder MUST exist, while the file MUST NOT exist). And other details.
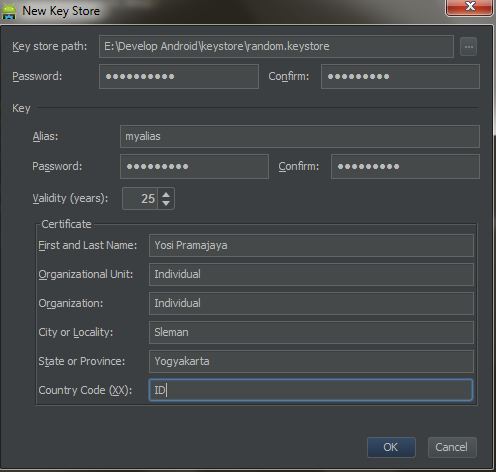
– It will automatically completed our last dialog in keystore. Just click “Next”
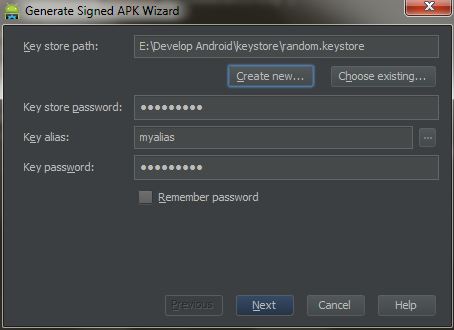
– And “Finish”
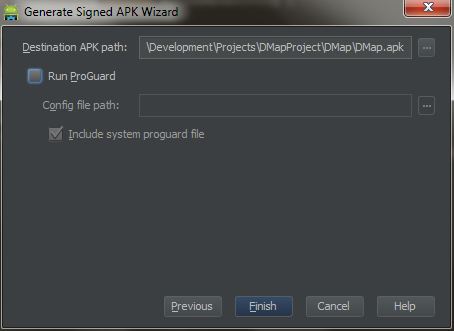

TIPS & TRICKS
If you want to change to Darcula Look and Feel, (in Windows) just press: “Ctrl + ~” -> “Switch Look and Feel” -> “Darcula”.
This look and feel is very interesting, and I like it so much.

-------------------------------------------------------------------------------
Facebook Android App like UI


I did something like below: enter image description here
enter image description here
Below is my code for something like facebook side menu bar
  1. I put 2 views overlap in a frame layout. The bottom view is the menu, the top view is the content body.
  2. And I put the content body into a horizantal scroll view. I also put a view to the left of the content body in the horizantal scroll view. And set the view's background as transparent.
  3. Then scroll to content body at begining. So the side menu bar is blocked by the content body.
  4. When click a button to show the menu, I scroll the horizantal scroll view to show the transparent placeholder. Then the menu will show up since it is under the transparent placeholder now.
I did not use XML for the interface. I create everything in the below code. I think it should be easy to read and put into your eclipse.
package com.chaoshen.androidstudy.facebooklikesidemenubar;


import android.os.Bundle;
import android.app.Activity;
import android.graphics.Color;
import android.view.Display;
import android.view.MotionEvent;
import android.view.View;
import android.view.View.OnClickListener;
import android.view.ViewGroup.LayoutParams;
import android.widget.Button;
import android.widget.FrameLayout;
import android.widget.HorizontalScrollView;
import android.widget.LinearLayout;
import android.widget.TextView;

public class MainActivity extends Activity{

    private boolean Menu_Displayed=false;

    @Override
    public void onCreate(Bundle savedInstanceState) {
        super.onCreate(savedInstanceState);

        Display display = getWindowManager().getDefaultDisplay();
        final int width = display.getWidth();

        // menu:
        LinearLayout li_menu = new LinearLayout(this);
        li_menu.setLayoutParams(new LayoutParams(LayoutParams.FILL_PARENT, LayoutParams.FILL_PARENT));  
        li_menu.setOrientation(1);//1 is vertical
        li_menu.setBackgroundColor(Color.GREEN);

        Button btn1 = new Button(this);
        btn1.setText("button 1");
        btn1.setLayoutParams(new LayoutParams(LayoutParams.WRAP_CONTENT, LayoutParams.WRAP_CONTENT));  

        li_menu.addView(btn1);

        //body:
        final HorizontalScrollView hsv = new HorizontalScrollView(this){
            @Override
            // do not let hsv consume the click itself. Then the view under the hsv will also consume the click
            //so that the menu will be clicked
            //when menu is not showed up, let hsv be the only view to consume the click.
            //so that the menu will not be clicked
            public boolean onTouchEvent(MotionEvent ev) {
                if(Menu_Displayed){
                    return false;
                }
                else{
                    return true;
                }
            }
        };
        hsv.setLayoutParams(new LayoutParams(LayoutParams.FILL_PARENT, LayoutParams.FILL_PARENT));  
        hsv.setBackgroundColor(Color.TRANSPARENT);
        hsv.setHorizontalFadingEdgeEnabled(false);
        hsv.setVerticalFadingEdgeEnabled(false);

        final LinearLayout li_body = new LinearLayout(this);
        li_body.setLayoutParams(new LayoutParams(LayoutParams.WRAP_CONTENT, LayoutParams.FILL_PARENT));  
        li_body.setOrientation(0);//0 is horizantal
        li_body.setBackgroundColor(Color.TRANSPARENT);

        hsv.addView(li_body);

        //body: place holder transparent
        TextView placeholder = new TextView(this);
        placeholder.setTextColor(Color.TRANSPARENT); 
        placeholder.setLayoutParams(new LayoutParams(width-100, LayoutParams.FILL_PARENT));  
        placeholder.setVisibility(View.INVISIBLE);
        li_body.addView(placeholder);

        //body: real content
        LinearLayout li_content = new LinearLayout(this);
        li_content.setLayoutParams(new LayoutParams(width, LayoutParams.FILL_PARENT));  
        li_content.setOrientation(1);//1 is vertical
        li_content.setBackgroundColor(Color.CYAN);

        TextView tv1 = new TextView(this);  
        tv1.setText("txt 1");  
        tv1.setTextSize(40);  
        tv1.setTextColor(Color.BLACK);  

        TextView tv2 = new TextView(this);  
        tv2.setLayoutParams(new LayoutParams(LayoutParams.FILL_PARENT, LayoutParams.WRAP_CONTENT));  
        tv2.setTextSize(50);  
        tv2.setText("txt 2");  
        tv2.setTextColor(Color.WHITE);  

        //use this button to scroll
        Button btn_showMenu = new Button(this);
        btn_showMenu.setText("Menu");
        btn_showMenu.setLayoutParams(new LayoutParams(LayoutParams.WRAP_CONTENT, LayoutParams.WRAP_CONTENT));
        btn_showMenu.setOnClickListener(new OnClickListener() {

            @Override
            public void onClick(View v) {
                hsv.post(new Runnable() {

                    @Override
                    public void run() {
                        if(Menu_Displayed){
                            hsv.smoothScrollTo(width-100, 0);
                        }
                        else{
                            hsv.smoothScrollTo(0, 0);
                        }
                        Menu_Displayed = !Menu_Displayed;
                    }
                });
            }
        });

        li_content.addView(tv1);
        li_content.addView(tv2);
        li_content.addView(btn_showMenu);

        li_body.addView(li_content);

        //add menu and body in to frame
        FrameLayout mainFrame = new FrameLayout(this);  
        mainFrame.setLayoutParams(new LayoutParams(LayoutParams.FILL_PARENT, LayoutParams.FILL_PARENT));  
        mainFrame.addView(li_menu);  
        mainFrame.addView(hsv);  

        //scroll to the body real content to block the menu
        hsv.post(new Runnable() {

            @Override
            public void run() {
                hsv.scrollBy(width-100, 0);             
            }
        });

        setContentView(mainFrame);         
    }
}
 
 
 BEST CODE FOR SLIDER http://www.androidhive.info/2013/11/android-sliding-menu-using-navigation-drawer/


Android sidebar like facebook or firefox

 
 --------------------------------------------------------------------------------------

Android Facebook style slide


Use SideNavigationView for side menu like facebook. But you will need a library for this which you can download from here "https://github.com/johnkil/SideNavigation".
Code for using it is:
SideNavigationView  sideNavigationView;
sideNavigationView = (SideNavigationView)findViewById(R.id.side_navigation_view);
sideNavigationView.setMenuItems(R.menu.sliding);
sideNavigationView.toggleMenu();
Now, make menu you want to show in Slide menu.
All the best....

Horizontal facebook style silder

Layout Animation Android[Facebook]


Technical implementation

The side navigation isn't (yet) included in the Android SDK. A quick search in github does reveal one project that has implemented the UI pattern.

android-fb-like-slideout-navigation at github
There's also a video demonstrating the library at work.

EDIT: Here's another library project:
https://github.com/darvds/RibbonMenu
Thanks Mr BuBBLs in comments!

Two more library project:
https://bitbucket.org/jfeinstein10/slidingmenu/overview
https://github.com/Gregadeaux/android-fly-in-app-navigation

If you know any other library projects doing this please leave a comment bellow or at the Google+ page!

Cyril Mottier has also written about implementing this pattern in his blog. These posts are very much worth reading:
The making of Prixing #1: Fly-in app menu
The making of Prixing #2: Swiping the fly-in app menu
The making of Prixing #3: Polishing the sliding app menu

See also the Prixing app on the Google Play to try out the side navigation implemented by Cyril.


Ok After spending 2 days reading about similair problems and how people solved them I finally was able to create the thing I wanted. I was not able to do it with 2 diffrent XML files, but I doubt it is not possible.
I did encountert some problems tho.
After the first animation ended, the button was not clickable. This is because the animation shows that everything is moved but it does not update the layout, so the button is still at the position where the animation started. So I had to calculate the new position of the layout.
I think I read somewhere that this is no longer an issue in 3.0, but correct me if I am wrong
Another was that when I had my animation finally working the way I wanted my underlaying view did disapear before the animation was finished because I invoked view.setVisabilty(View.GONE);. Now the problem was when I did not invoke that method, the animation just hang for a second and then shooter to the end position of the animation. So I added a empty LinearLayout (can be anything) , Default property on GONE, when the animation starts set it on Visible. when you revert the animation, set it again to gone. after doing this the animation was working the way I wanted.
And if you are using a Rel, Linear, or any other layout. then you cant stack views in the Z order so you have to use an SurfaceView.
so heres main.xml
 <?xml version="1.0" encoding="utf-8"?>
<RelativeLayout xmlns:android="http://schemas.android.com/apk/res/android"
    android:id="@+id/RelativeLayout1"
    android:layout_width="fill_parent"
    android:layout_height="fill_parent"
    android:orientation="vertical" >

    <SurfaceView
        android:id="@+id/surfaceView1"
        android:layout_width="fill_parent"
        android:layout_height="fill_parent" />

    <RelativeLayout
        android:id="@+id/layout"
        android:layout_width="220dp"
        android:layout_height="fill_parent"
        android:background="#ffee00"
        android:orientation="vertical" >

        <LinearLayout
            android:id="@+id/fake_layouy"
            android:layout_width="wrap_content"
            android:layout_height="wrap_content"
            android:orientation="vertical" android:visibility="gone">
        </LinearLayout>

        <ListView
            android:id="@+id/listView1"
            android:layout_width="match_parent"
            android:layout_height="wrap_content" >
        </ListView>
    </RelativeLayout>

    <RelativeLayout
        android:id="@+id/layoutTwo"
        android:layout_width="fill_parent"
        android:layout_height="fill_parent"
        android:background="#ff00ee"
        android:orientation="vertical">

        <LinearLayout
            android:id="@+id/linearLayout1"
            android:layout_width="fill_parent"
            android:layout_height="wrap_content"
            android:layout_alignParentLeft="true"
            android:layout_alignParentTop="true" android:background="#ff0000" android:layout_margin="2dp">

            <Button
                android:id="@+id/button"
                android:layout_width="50dp"
                android:layout_height="wrap_content"
                android:text="slide" />
        </LinearLayout>

    </RelativeLayout>

</RelativeLayout>
heres the java code
    public class MenuAnimationActivity extends Activity {

    private Button buttonSwitch;  
    private View subLayout;
    private View topLayout;
    private ListView subViewListView;
    private String listViewDummyContent[]={"Android","iPhone","BlackBerry","AndroidPeople"};
    private Display display;
    private View fakeLayout;
    private AnimationListener AL;

    // Values for after the animation
    private int oldLeft;
    private int oldTop;
    private int newleft;
    private int newTop;
    private int screenWidth;    
    private int animToPostion; 
    // TODO change the name of the animToPostion for a better explanation.

    private boolean menuOpen = false;

        /** Called when the activity is first created. */  
        @Override  
        public void onCreate(Bundle savedInstanceState) {  
            super.onCreate(savedInstanceState);  
            setContentView(R.layout.main);  

            buttonSwitch = (Button)findViewById(R.id.button);  
            subLayout = (View) findViewById(R.id.layout);  
            topLayout = (View) findViewById(R.id.layoutTwo);
            subViewListView=(ListView)findViewById(R.id.listView1);
            fakeLayout = (View)findViewById(R.id.fake_layouy);

            subViewListView.setAdapter(new ArrayAdapter<String>(this,android.R.layout.simple_list_item_1 , listViewDummyContent));

            display =  getWindowManager().getDefaultDisplay();
            screenWidth = display.getWidth();
            int calcAnimationPosition = (screenWidth /3);

            // Value where the onTop Layer has to animate
            // also the max width of the layout underneath 
            // Set Layout params for subLayout according to calculation
            animToPostion = screenWidth - calcAnimationPosition;

            RelativeLayout.LayoutParams params = new RelativeLayout.LayoutParams(animToPostion, RelativeLayout.LayoutParams.FILL_PARENT);
            subLayout.setLayoutParams(params);

             topLayout.setOnTouchListener(new OnTouchListener() {

                @Override
                public boolean onTouch(View v, MotionEvent event) {

                        if(event.getAction() == MotionEvent.ACTION_DOWN) {
                            if (menuOpen == true) {
                                animSlideLeft();
                            }
                        }

                    return false;
                }
            });

            buttonSwitch.setOnClickListener(new View.OnClickListener() {  

               @Override  
               public void onClick(View v) { 
                   if(menuOpen == false){    
                       animSlideRight();
                   } else if (menuOpen == true) {
                       animSlideLeft();
                       }
                   }  
                  });  

             AL = new AnimationListener() {

                @Override
                public void onAnimationStart(Animation animation) {
                    buttonSwitch.setClickable(false);
                    topLayout.setEnabled(false);
                }           
                @Override
                public void onAnimationRepeat(Animation animation) {
                    // TODO Auto-generated method stub

                }               
                @Override
                public void onAnimationEnd(Animation animation) {
                    if(menuOpen == true) {
                        Log.d("", "Open");              
                        topLayout.layout(oldLeft, oldTop, oldLeft + topLayout.getMeasuredWidth(), oldTop + topLayout.getMeasuredHeight() );
                        menuOpen = false;
                        buttonSwitch.setClickable(true);
                        topLayout.setEnabled(true);
                    } else if(menuOpen == false) {
                        Log.d("","FALSE");
                        topLayout.layout(newleft, newTop, newleft + topLayout.getMeasuredWidth(), newTop + topLayout.getMeasuredHeight() );                    
                        topLayout.setEnabled(true);
                        menuOpen = true;
                        buttonSwitch.setClickable(true);
                    }
                }
            };
        } 

        public void animSlideRight(){

                    fakeLayout.setVisibility(View.VISIBLE);
                newleft = topLayout.getLeft() + animToPostion;
                newTop = topLayout.getTop();    
                TranslateAnimation slideRight = new TranslateAnimation(0,newleft,0,0);
                slideRight.setDuration(500);   
                slideRight.setFillEnabled(true);   
                slideRight.setAnimationListener(AL);    
                topLayout.startAnimation(slideRight);           
        }

        public void animSlideLeft() {

            fakeLayout.setVisibility(View.GONE);
            oldLeft = topLayout.getLeft() - animToPostion;
            oldTop = topLayout.getTop();        
            TranslateAnimation slideLeft = new TranslateAnimation(newleft,oldLeft,0,0);
            slideLeft.setDuration(500);   
            slideLeft.setFillEnabled(true);   
            slideLeft.setAnimationListener(AL);    
            topLayout.startAnimation(slideLeft);                
        }
}  
I did some extra coding on touching views and stuff.
And the final result
before Animation
enter image description here
after First Animation
enter image description here
And after the second Animation back to the left it states returns as the first Image.
Al those posts that helped me really deserve some credit but I cant find any of them.
Edit
GIT https://bitbucket.org/maikelbollemeijer/sidepanelswitcher

Monday, 19 January 2015

all about magento - tricks and solution

https://www.google.co.in/search?q=slider+for+magento+home+page

http://freemagento.blogspot.in/2012/10/how-to-display-magento-categories-on.html?view=sidebar 


How to add slideshow on magento homepage

Step 1: Login magento admin panel goto pages under CMS
          Click on content and enter below code


<!--Image Slider Start-->
<div id="slide" align="center">
<script type="text/javascript">// <![CDATA[
var image1=new Image()
image1.src="{{skin url=images/media/slideshow/1.jpg}}"
var image2=new Image()
image2.src="{{skin url=images/media/slideshow/2.jpg}}"
var image3=new Image()
image3.src="{{skin url=images/media/slideshow/3.jpg}}"
var image4=new Image()
image4.src="{{skin url=images/media/slideshow/4.jpg}}"
var image5=new Image()
image5.src="{{skin url=images/media/slideshow/5.jpg}}"
// ]]></script>
<a href="http://www.myhomendeco.com/index.php/bed-rooms.html"> <img src="{{skin url=images/1.jpg}}" alt="" name="slide" width="900" height="277" border="2" /></a>
<script type="text/javascript">// <![CDATA[
//variable that will increment through the images
var step=1
function slideit(){
//if browser does not support the image object, exit.
if (!document.images)
return
document.images.slide.src=eval("image"+step+".src")
if (step<3)
step++
else
step=1
//call function "slideit()" every 2.5 seconds
setTimeout("slideit()",5000)
}
slideit()
// ]]></script>
</div>
<!--Image Slider End-->


Step 2: Go to below folder
skin/frontend/default/Your_theme/images/media/
create a folder(name:slideshow)
put 5 image files(give name 1.jpg,2.jpg,3.jpg,4.jpg,5.jpg)
and reload

meanwhile refresh and flush you magento cache
---------------------------------------------------------------------------------------------------------
add-a-image-slider-banner-in-magento-home-page

<!--Image Slider Start-->
    
    <div align="center">
<script type="text/javascript">

var image1=new Image()
image1.src="{{skin url=images/banner_1.jpg}}"
var image2=new Image()
image2.src="{{skin url=images/banner_2.jpg}}"
var image3=new Image()
image3.src="{{skin url=images/banner_3.jpg}}"

</script>
<a href="http://##">
<img src="{{skin url=images/banner_1.jpg}}" border="2" name="slide" width="890" height="277" /></a>
<script>

//variable that will increment through the images
var step=1
function slideit(){
//if browser does not support the image object, exit.
if (!document.images)
return
document.images.slide.src=eval("image"+step+".src")
if (step<3)
step++
else
step=1
//call function "slideit()" every 2.5 seconds
setTimeout("slideit()",5000)
}
slideit()

</script>

</div>
<!--Image Slider End-->
------------------------------------------------------------------------------

send mail with attached file

in magento there is no available methods for attach file. once we do it in magento by adding a following code
in  mage/core/model/email/template.php at the end of file.

public function addAttachment(Zend_Pdf $pdf){
        $file = $pdf->render();
        $attachment = $this->getMail()->createAttachment($file);
        $attachment->type = 'application/pdf';
    $attachment->filename = 'yourfile.pdf';
    }
   
but i prefer to use Zend_Mail to send mail with attached file.
for this u need to do following.

try{
            $mail = new Zend_Mail();
            $mail->setFrom("fromemail","fromname");
            $mail->addTo("toemail","toname");
            $mail->setSubject("subject");
            $mail->setBodyHtml(" body text"); // here u also use setBodyText options.
       
            // this is for to set the file format
            $content = file_get_contents("$file_path");
            $at = new Zend_Mime_Part($content);
           
            $at->type        = 'application/csv'; // if u have PDF then it would like -> 'application/pdf'
            $at->disposition = Zend_Mime::DISPOSITION_INLINE;
            $at->encoding    = Zend_Mime::ENCODING_8BIT;
            $at->filename    = $filename;
            $mail->addAttachment($at);
            $mail->send();
  
        }catch(Exception $e)
        {
            echo $e->getMassage();
           
        }


and this is ready.. just go for it.
-----------------------------------------------------------------------------------------

Magento payment option

In your config.xml from app>code>your_codepol>Namespace>module>etc>config.xml
<frontend>
    <events>
        <payment_method_is_active>
            <observers>
                <paymentfilter_payment_method_is_active>
                    <type>singleton</type>
                    <class>YOUR_CLASS_observer</class>
                    <method>paymentMethodIsActive</method>
                </paymentfilter_payment_method_is_active>
            </observers>
        </payment_method_is_active>
    </events>
</frontend>
and create your observer and write this code in your observer.php
public function paymentMethodIsActive(Varien_Event_Observer $observer) {
    $event           = $observer->getEvent();
    $method          = $event->getMethodInstance();
    $result          = $event->getResult(); 
$quote  = $observer->getEvent()->getQuote();
$shippingMethod = $quote->getShippingAddress()->getShippingMethod();
   if($shippingMethod=="Free International Shipping"){
        if($method->getCode() == 'cashondelivery' ){ // to hide this method
            $result->isAvailable = false; // false means payment method is disable
        }
}
}
Where cashondelivery is payment method name. You can write any payment name like
  1. ccsave(Credit Card (saved))
  2. checkmo(Check / Money order)
  3. purchaseorder(Purchase Order)
  4. banktransfer(Bank Transfer Payment)
  5. cashondelivery(Cash On Delivery) etc..
Let me know if you have any query
----------------------------------------------------

class Inchoo_Vendor_Model_Activpayment
{
 
 
 public function getActivPaymentMethods()
 {
    $payments = Mage::getSingleton('payment/config')->getActiveMethods();
 
    $methods = array(array('value'=>'', 'label'=>Mage::helper('adminhtml')->__('--Please Select--')));
 
    foreach ($payments as $paymentCode=>$paymentModel) {
            $paymentTitle = Mage::getStoreConfig('payment/'.$paymentCode.'/title');
            $methods[$paymentCode] = array(
                'label'   => $paymentTitle,
                'value' => $paymentCode,
            );
        }
 
        return $methods;
 
 } 
 
}
--------------------------------------------------

Magento Observer Event on Order Place not firing

What is the correct way to set up an observer in Magento?

How do you allow the payment option to be preselected if products are free?

Go to the following file and edit it as appropriate
app\design\frontend\videocard\default\template\checkout\onepage\payment

<dl id="checkout-payment-method-load">
<?php
    $methods = $this->getMethods();
    $oneMethod = count($methods) <= 1;
?>
<?php 
    $nopay = false;
    foreach ($methods as $_method):
        $_code = $_method->getCode();      
        if($_code == 'free') {
            $nopay = true;
        }
    endforeach;  
?>
<?php 
  
    foreach ($methods as $_method):
        $_code = $_method->getCode();
?>
    <dt>
    <?php if ($nopay == false) : ?>
        <?php if(!$oneMethod): ?>
            <input id="p_method_<?php echo $_code ?>" value="<?php echo $_code ?>" type="radio" name="payment[method]" title="<?php echo $this->htmlEscape($_method->getTitle()) ?>" onclick="payment.switchMethod('<?php echo $_code ?>')"<?php if($this->getSelectedMethodCode()==$_code): ?> checked="checked"<?php endif; ?> />
        <?php else: ?>
            <span><input id="p_method_<?php echo $_code ?>" value="<?php echo $_code ?>" type="radio" name="payment[method]" checked="checked" /></span>
            <?php $oneMethod = $_code; ?>
        <?php endif; ?>
            <label for="p_method_<?php echo $_code ?>"><?php echo $this->getMethodTitle($_method) ?> <?php echo $this->getMethodLabelAfterHtml($_method) ?></label>
        </dt>
        <?php if ($html = $this->getPaymentMethodFormHtml($_method)): ?>
        <dd>
            <?php echo $html; ?>
        </dd>
        <?php endif; ?>
    <?php else : ?>
        <?php if($_code == 'free') : ?>
            <span><input id="p_method_<?php echo $_code ?>" value="<?php echo $_code ?>" type="radio" name="payment[method]" checked="checked" /></span>
            <?php $oneMethod = $_code; ?>
            <label for="p_method_<?php echo $_code ?>"><?php echo $this->getMethodTitle($_method) ?> <?php echo $this->getMethodLabelAfterHtml($_method) ?></label>
        </dt>
        <?php if ($html = $this->getPaymentMethodFormHtml($_method)): ?>
        <dd>
            <?php echo $html; ?>
        </dd>
            <?php endif; ?>
        <?php endif; ?>
    <?php endif; ?>
<?php endforeach; ?>
</dl>
<?php echo $this->getChildChildHtml('additional'); ?>
<script type="text/javascript">
//<![CDATA[
<?php echo $this->getChildChildHtml('scripts'); ?>
payment.init();
<?php if (is_string($oneMethod)): ?>
    payment.switchMethod('<?php echo $oneMethod ?>');
<?php endif; ?>
//]]>
</script>
--------------------------


Thursday, 15 January 2015

best business ideas entrepreneur how to save and invest money in india


http://www.getmoneyrich.com/

http://www.getmoneyrich.com/is-five-crore-enough-for-retirement/ 

http://business.mapsofindia.com/business-ideas/business-ideas-with-low-investment.html 

http://www.brainreactions.net/brainstorms/2222 

http://knoema.com/obvfwke/top-companies-turnover-in-india-2012 
http://www.mytopbusinessideas.com/india/

http://www.mytopbusinessideas.com/guide-writing-business-plan/
Bookkeeping</h4>
You can run bookkeeping or accounting business from your home. If you
are well acquainted with bookkeeping, accounting processes, and
accounting standards, you can look for bookkeeping jobs that can be done
 from your residence. You need a computer with Internet connection and
some accounting software packages that you need to install in your PC.<br /><br />

<h4>
Daycare Center</h4>
Daycare Center is an excellent business choice which necessitates a
trivial amount of investment. The most attractive part of this business
is that you can do it from your house. In addition, there is no
requirement to make a huge investment on infrastructure. The things you
have to purchase include books, toys, and games for the kids. The other
things are there in your home. Nonetheless, you might have to redesign
your home as per the requirements of the kids. A number of safety
measures needs to be adopted such as keeping electrical devices in a
place which is inaccessible to the kids and meshing the veranda.<br /><br />

Nevertheless, to operate a daycare center profitably, some experienced
and qualified professionals should be employed who can manage and
comprehend the requirements of the kids.<br /><br />


<div id="div-gpt-ad-1403519927820-0">

</div>
<h4>
Consultation</h4>
Consultation is a good business choice to start with a nominal amount of
 investment. You can work as a financial consultant or a real estate
consultant if you have the requisite qualifications and expertise. As a
financial consultant, you can guide people on doing the right investment
 at the right time. As a real estate consultant, you can help people in
buying and selling of real estate. Other types of consultancies such as
architectural and home design consultancies are gaining popularity.  

How to Save Money in India?

Interest Rates on Savings Account

Deposit Type Name of Bank Offered Interest Rate
Saving YES Bank 7%
Saving Kotak Bank 5.50%
Saving Ratnakar Bank 5.50%
Saving All Other Banks 4%

9. Save huge money by Planning Taxes

Our target is to save every bit possible from our salary. By planning our taxes we save a good deal of money from salary. Let me give you an example to explain how much we can save by planning our taxes. Small savings like these can make hell of a difference in long term. In India, rules allow us to save money from salary as listed below:U/s 80C – Over all exemption is Rs 100,000/year
(Investment in ELSS, PPF, NSC, LIC, Home Loan Principal etc)
U/s 80D – Over all exemption is Rs 15,000 (Rs 20,000 for Senior Citizen)
(Health insurance for Self, family, dependent parents)
U/s 80E – 100% interest on education Loan is exempted from Income Tax
(Education loan taken for higher studies of self, spouse, children)
Examples Income per Year Tax Saving Tax Payable Savings/ year compared to Ex. 1
80C 80D 80E
1 500,000 0 0 0 28,840 0
2 500,000 10,000 0 0 27,810 1,030
3 500,000 30,000 0 0 25,750 3,090
4 500,000 50,000 0 0 23,690 5,150
4 500,000 75,000 0 0 21,115 7,725
5 500,000 100,000 0 0 18,540 10,300
6 500,000 100,000 15,000 0 16,995 11,845
7 500,000 100,000 15,000 25,000 14,420 14,420

10. Develop these Small-Saving-Habits

When it comes to long term savings, even small savings make a big difference. Lets see some small savings habits that we can implement in our day to day life:
  • Driving a diesel car will save you Rs20/liter compared to Petrol. Driving a CNG car will save Rs 35/liter compared to petrol.
  • Buying groceries in bulk from places like D-Mart can reduce your monthly bill by about 3-5%.
  • Instead of buying new books to read, try a smart phone app that provides free audio-books. This can save at least Rs500 per month.
  • When you leave your house switch-off electrical appliances. Never leave chargers/TV/Phone/Music/Laptops/Microwaves on standby mode. This itself will reduce your electricity bill by nearly 3%
  • Buy clothes in bulk on those February month SALE. Idea shall be to buy all news clothes for that year in February (as far as possible). Use these new clothes as and when the occasion comes. This can save you nearly 30-50% of cost you spend annually on clothing’s.
  • Try jogging early morning in open air. This can reduce your gym bill by Rs20,000 anually.
  • Before you swap your credit card, ask yourself if you had to pay by cash, would you have paid for this purchase? Generally because we are using credit cards, we buy things we cant afford. This small habit of self checking ca reduce your unnecessary purchases by 5-10%.
  • Plan your annual vacations in advance. Book air tickets 3-4 months in advance. Do hotel bookings 3-4 months in advance.


Best Dividend Paying Stocks in India

Top 15 Stocks (Lump Sum Dividend)

SL Company Average Dividend in Last 5Years (Rs.Cr.)
1 ONGC 7,828.28
2 CIL 7,630.02
3 TCS 4,424.16
4 ITC 3,940.06
5 NTPC 3,809.39
6 Infosys 2,721.60
7 RIL 2,484.33
8 HUL 2,252.18
9 IOC 2,058.90
10 NMDC 1,986.32
11 Hero MotoC 1,537.83
12 Wipro 1,505.40
13 BHEL 1,249.52
14 OIL INDIA 1,191.45
15 Bajaj Auto 1,157.47

Top 15 Stocks (Dividend Paid / Share)

SL Company AVERAGE DIV. (5Y)
1 Hero MotoC 77.01
2 Bosch 64.00
3 Nestle 48.50
4 Infosys 47.46
5 Bajaj Auto 44.00
6 GLAXOSMITHKLINE PHAR 43.00
7 PAGE IND. 38.80
8 GLAXOSMITHKL CONS. 38.60
9 SANOFI INDIA 37.20
10 OIL INDIA 34.10
11 MRF 30.99
12 Asian Paints 30.06
13 ACC 28.30
14 ENGINEERS IND 25.90
15 BLUE DART 25.00


Wednesday, 14 January 2015

how to edit magento theme full explanation

eros theme

CMS .. PAGE >>Home Page

{{block type="customblocks/customblock" alias="root" template="customblocks/customblock.phtml"}}
{{block type="catalog/product_list" name="home.catalog.product.list" alias="products_homepage" template="catalog/product/list.phtml"}}

 system>>config>>

  ------------------------

http://inchoo.net/magento/custom-category-menu-navigation-in-magento/ 

The result

Et voilà! You should be able to see the navigation on the right column of your page. It’s not exactly the prettiest list, but I trust you’ll be able to style it to suit your needs.


custom-category-menu-example

 ----------------------------- 

How to remove right sidebar in magento


go to magento admin click on cms home page , click on design now select layout 1 column now save and refresh page

https://gist.github.com/Maksold/3956702  LOCAL.XML
-------------------------------------------------------------------------------------------

How to manage home page sidebar blocks

Home Page blocks.

Home page blocks in Magento are controlled by the Magento administration panel. So all change should be done there.
1. Open Magento admin panel
2. Go to CMS > Pages > Home Page
3. Open the Design tab, in the Layout Update XML field you can see the home page blocks code.

Here are some examples:

Popular Tags block
?
1
<block  type="tag/popular" name="tags_popular"  template="tag/popular.phtml"/><p></p>

Community Poll block
?
1
2
3
4
<block  type="poll/activePoll" name="right.poll"><br>
<action method="setPollTemplate"><template>poll/active.phtml</template><type>poll</type></action><br>
<action method="setPollTemplate"><template>poll/result.phtml</template><type>results</type></action><br>
</block><p></p>

Newsletter Sign-Up block
?
1
<block  type="newsletter/subscribe" name="left.newsletter"  template="newsletter/subscribe.phtml"/><p></p>

Sidebar callout(banner) block
?
1
2
3
4
5
<p><block  type="core/template" name="left.permanent.callout"  template="callouts/left_col.phtml"><br>
  <action  method="setImgSrc"><src>images/media/col_left_callout.jpg</src></action><br>
  <action  method="setImgAlt" translate="alt"  module="catalog"><alt>iPod  classic</alt></action><br>
  <action  method="setLinkUrl"><url>storage.html</url></action><br>
  </block></p>

You can change the blocks order or delete any of the blocks editing the XML code.


Magento Tutorials


Magento. How to manage search 

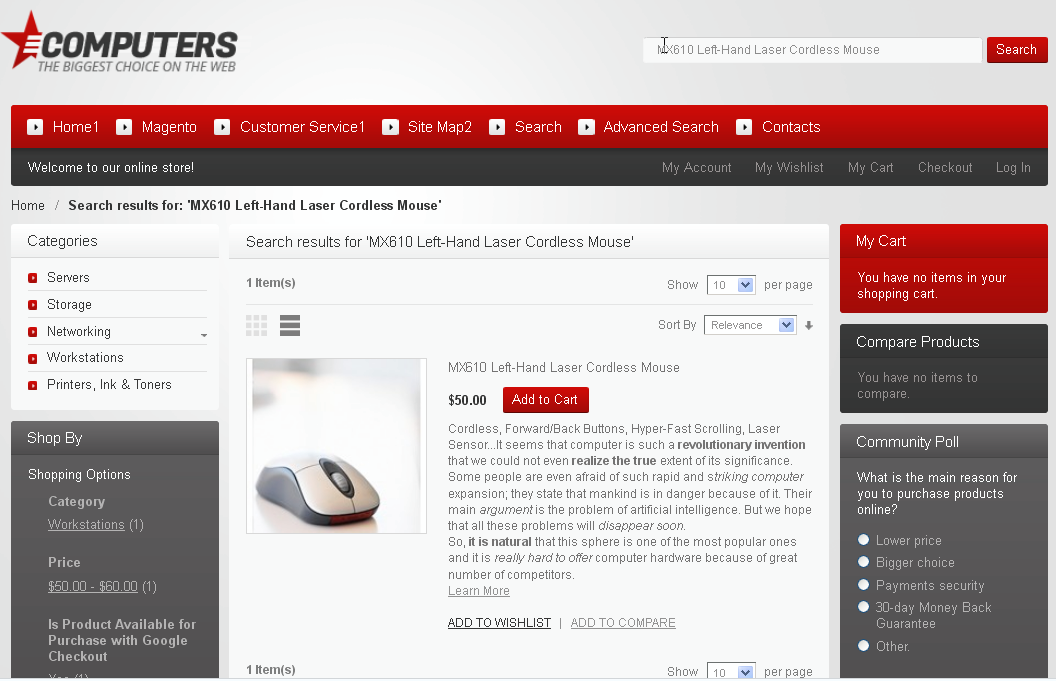
. First of all you need to set product Visibility. Go to Admin section-Catalog-Manage Products. Open particular product. In General tab you will find Visibility section. There you should select appropriate option.


We recommend you to select Catalog, Search option. In this case product will appear in both catalog and search results. When you select Catalog option product will now show up in search results. We have searched for MX610 Left-Hand Laser Cordless Mouse product. Screenshot of result you can check below.

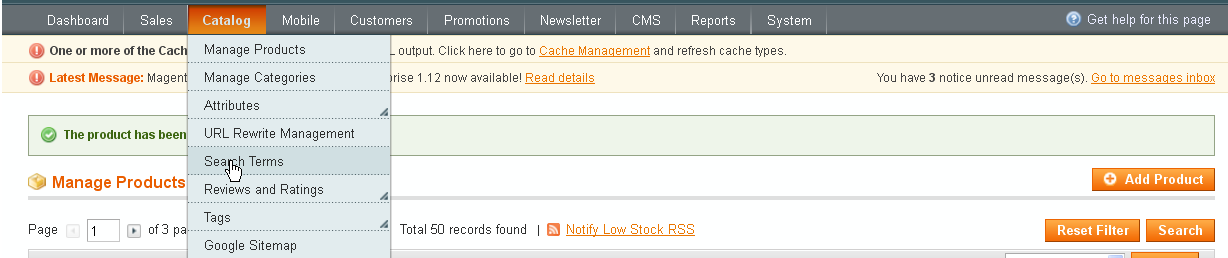
2. In order to enhance search results we can specify Search Terms. Go to Catalog-Search Terms.

Click on Add New Search Term. There you should specify search query and synonym (optionaly). As synonym we have copied part of product name. It means that set of products can appear in search results. We have entered Best computer Search Query with HP Pavilion Synonym. After that we need to save changes. Screenshot with search term settings you can find below.


Magento : How to add a static CMS block to the side bar (twitter example)

[stextbox id="custom" color="ffffff" bcolor="ffffff'" bgcolor="000000" image="null" float="true" width="600"]
This is a simple thing to achieve but the questions is asked over and over again so I thought it might worth adding a quick tutorial here.  For the sake of an example we will look at how to add your twitter feed to the left hand menu.
[/stextbox]

Step one.. get the twitter code from here : http://twitter.com/about/resources/widgets/widget_profile
Style it to match the colour, size and shape of your theme.
Your final code will look something like
[php]
<script src="http://widgets.twimg.com/j/2/widget.js"></script>
<script>
new TWTR.Widget({
version: 2,
type: ‘profile’,
rpp: 8,
interval: 6000,
width: ‘auto’,
height: 200,
theme: {
shell: {
background: ‘#333333′,
color: ‘#ffffff’
},
tweets: {
background: ‘#000000′,
color: ‘#ffffff’,
links: ‘#4aed05′
}
},
features: {
scrollbar: true,
loop: false,
live: true,
hashtags: true,
timestamp: true,
avatars: false,
behavior: ‘all’
}
}).render().setUser(‘dx3webs’).start();
</script>
[/php]
Step Two
In Magento Goto CMS > Static Blocks.
Create a new block
Title: myTwitter
Indentifier: twitter
Status: Enabled
Content: Paste your twitter code in here.
Save
Step Three
Open app/design/frontend/xxxxxx/xxxxxx/layout/catalog.xml
Add your static block to the left or right section in
[php]
<!– Mage_Catalog –>
[/php]
(near the top of the file)
For example to add to the left sidebar.. (Having already removed that damned dog call out)
[php]
<reference name="left">
<block type="cms/block" name="myTwitter" >
<action method="setBlockId"><block_id>twitter</block_id></action>
</block>
</reference>
[/php]
Bingo you have a new block showing your twitter updates. Needless to say you can add any html you like.


Choose from a range of magento tutorials:

..................................................

Meaning of numbers in col-md-4 , col-xs-1 , col-lg-2

Ignoring the letters (xs, sm, md, lg) for now, I'll start with just the numbers...
  • the numbers (1-12) represent a portion of the total width of any div
  • all divs are divided into 12 columns
  • so, col-*-6 spans 6 of 12 columns (half the width), col-*-12 spans 12 of 12 columns (the entire width), etc
So, if you want two equal columns to span a div, write
<div class="col-xs-6">Column 1</div>
<div class="col-xs-6">Column 2</div>
Of if you want three unequal columns to span that same width, you could write:
<div class="col-xs-2">Column 1</div>
<div class="col-xs-6">Column 2</div>
<div class="col-xs-4">Column 3</div>
You'll notice the # of columns always add up to 12. It can be less than twelve, but beware if more than 12, as your offending divs will bump down to the next row (not .row, which is another story altogether).
You can also nest columns within columns, (best with a .row wrapper around them) such as:
<div class="col-xs-6">
  <div class="row">
    <div class="col-xs-4">Column 1-a</div>
    <div class="col-xs-8">Column 1-b</div>
  </div>
</div>
<div class="col-xs-6">
  <div class="row">
    <div class="col-xs-2">Column 2-a</div>
    <div class="col-xs-10">Column 2-b</div>
  </div>
</div>
Each set of nested divs also span up tp 12 columns of their parent div. NOTE: Since each .col class has 15px padding on either side, you should usually wrap nested columns in a .row, which has -15px margins. This avoids duplicating the padding, and keeps the content lined up between nested and non-nested col classes.
-- You didn't specifically ask about the xs, sm, md, lg usage, but they go hand-in-hand so I can't help but touch on it...
In short, they are used to define at which screen size that class should apply:
  • xs = extra small screens (mobile phones)
  • sm = small screens (tablets)
  • md = medium screens (some desktops)
  • lg = large screens (remaining desktops)


-------------------------

Menu Bar is not showing up in Eros theme for magento


This is the solution for displaying Menu in Eros theme
De-coment line 70 of file header.phtml in
app/design/frontend/fed/default/template/page/html.
<?php echo $this->getChildHtml(‘topMenu’); ?>

only delete // not echo

<?php echo $this->getChildHtml(‘topMenu’); ?>

uncomment on line no 70 for showing menu bar.

How to create a custom theme in Magento

Directory structure for themes in custom design package (CE)

The first part of creating your custom theme is to create your directory structure.

1
2
3
4
5
6
7
8
app
 + design
    + frontend
       + your_new_package_name  (package)
          + your_new_theme_name  (theme in your new package)
             + layout
             + template
             + locale
1
2
3
4
5
6
7
skin
  + frontend
     + your_new_package_name  (package)
        + your_new_theme_name  (theme in your new package)
           + css
           + images
           + js


Create new files

Finally, add some boiler plate to local.xml, so that custom.css and custom_js.js will get included:
?
1
2
3
4
5
6
7
8
9
10
11
12
13
14
15
16
17
18
19
<?xml version="1.0" encoding="UTF-8"?>
<layout>
    <default>
        <!-- Remove callouts and rarely used stuff -->
        <remove name="right.poll"/>
        <remove name="right.permanent.callout"/>
        <remove name="left.permanent.callout"/>
        <remove name="paypal.partner.right.logo"/>
        <!-- add the local stylesheet -->
        <reference name="head">
            <action method="addCss"><stylesheet>css/custom.css</stylesheet></action>
            <action method="addItem"><type>skin_js</type><name>js/custom_js.js</name></action>  
        </reference>
    </default>
</layout>
The Javascript files can be added to your theme by adding the following to local.xml: A well coded theme should have the following traits:
  1. A single layout file, named local.xml, where all layout updates are placed.
  2. no layout files with the same name as any layout file in the base theme.
  3. no css files with the same name as any css file in the default skin.
  4. no .phtml template files, except for those that were modified to support the new theme. (Usually this number will be very small.)

Applying your new package and theme to your website

Once you have created the skeleton directory structure to hold your new design package and theme, you will need to apply it to your Magento store so that you can see changes as you work. To see your new theme as you develop it, be sure to apply it to your development website using the Magento Admin Panel. On Admin section, go to  System -> Configuration -> Design tab. In the Package panel, set the Current Package Name to whatever you have named <your_package_name>. In the Themes panel, set the Default theme to default if you are creating a new theme in CE or to whatever you have named <your_theme_name>. Look image below.
Applying your new package and theme to your website Applying your new package and theme to your website

Understanding layout XML files

Introduction

Using xml instead of other methods (JSON, .ini files, include / require functions) allows us to change many aspects on our page without manually changing the .phtml files. This chapter refers to our default theme so after changing the theme (as we have done above) the paths will also change.

Layout / page structure

The core Layout is defined by page.xml which is located in /app/design/frontend/base/default/layout/page.xml. There are two large tasks layout carries out. First it defines the visual layout for your store. By default Magento uses a 3-column layout, so it defines use of 3columns.phtml (Located in your template/page/ folder):
?
1
<block type="page/html" name="root" output="toHtml" template="page/3columns.phtml">
If you wanted to change your store a 2-column layout, for instance, you would reference this section in local.xml, and use an action to change to the .phtml you’d like to use (in this case, 2columns-left.phtml or 2columns-right.phtml).
?
1
2
3
4
5
6
<reference name="root">
    <action method="setTemplate"><template>page/2columns-right.phtml</template>
    <!-- Mark root page block that template is applied -->
    <action method="setIsHandle"><applied>1</applied></action>
</action>
</reference>

Reference name values/attributes:

  • root - we will change it mostly to set up another .phtml file as a root template ex. (1column.phtml , 2columns-left.phtml ,2columns-right.phtml etc.).
  • head - as this reffers to our <HEAD> section on page, we will use this reference name to reflect our changes in this section.
  • top.menu - defines our content for top menu section.
  • left - defines our content for left column.
  • right - as above but for right column.
  • content - defines blocks placed in main content of our page.
  • footer - defines blocks placed in footer area.
if you wanted to modify category default page, for instance, you add below code in local.xml
?
1
2
3
4
5
6
7
8
9
10
11
12
13
14
15
16
17
18
19
20
21
22
23
24
25
26
27
28
29
30
31
32
33
34
35
<?xml version="1.0" encoding="UTF-8"?>
<layout>
<!--
    Category default layout
    -->
    <catalog_category_default>
        <reference name="root">
            <action method="setTemplate"><template>page/2columns-right.phtml</template></action>
        </reference>
        <reference name="head">
        </reference>
        <reference name="header">
        </reference>
        <reference name="left">
        </reference>
        <reference name="right">
            <block type="catalog/navigation" name="category.list" before="-" template="catalog/navigation/category_list.phtml"/>
        </reference>
        <reference name="content">
        </reference>
        <reference name="footer">
        </reference>
    </catalog_category_default>
</layout>
Same with pages <catalog_product_view>, <cms_page>, etc

Understanding .phtml files

Introduction

Phtml files are template files that handle the output to browser. They are nothing more than html files with nested php tags. We use them to style our page and the look of our site. Changing .phtml files requires basic knowledge about XHTML, CSS and understanding how to use PHP functions on a page. IMPORTANT: Before changing a .phtml file, it has to be copied from the base (or default) theme, into the new theme. When Magento finds one of these files in your new theme, it will ignore the .phtml file from the base theme, so it is important to ONLY copy over the files that you absolutely need to modify. This will minimize errors when updating Magento. The additional effort required to individually copy the 4-5 files you eventually modify will more than make up for itself the first time Magento needs to be updated.


Editing Columns, Footer, and Header in Magento


Right Column Block

The first problem was that there was a default Facebook block setup linking to the creators of the themes Facebook site. Since I am deploying this on a customers site, naturally I didn’t want this. However, I tried to search everywhere within the backend admin panel, and couldn’t remove it. Finally, I found the solution was as easy as removing a few lines of code from the 2columns-right.phtml file.
For your theme, you’ll want to browse to the folder: /app/design/frontend/<interface name>/<theme name>/template/page/
Inside this folder, you have a few more folders, but there are also a few *.phtml files. According to the template you’re using (1 column, 2 column, 3 columns), and the appropriate side column you want to edit (right or left), you should open this *.phtml file, and find the code that corresponds to the block you want to remove.
Your best bet for removing some code is to remove everything inside (and including) the <div><content to remove></div> tags.

Header and Footer *.phtml

Browsing now to: /app/design/frontend/<interface name>/<theme name>/template/page/html you will find the both the header.phtml and the footer.phtml files.

 ---------------------------------------------

add context in html


In the default header.phtml there is this line:
<p class="welcome-msg"><?php echo $this->getWelcome() ?> <?php echo $this->getAdditionalHtml() ?></p>
From my point of view you have 3 options.
Option 1. In case you want to add a simple text that does not depend on the page or user and you want to add it after the welcome message you can add this piece of code in your layout file:
<reference name="header">
    <action method="setAdditionalHtml"><additional>YOUR TEXT HERE</additional></action>
</reference>


http://excellencemagentoblog.com/blog/2011/09/22/magento-part2-series-layouts/

...................................................................................................................................................................