find your apk file in :-
AndroidStudioProjects\zoopmobile\app\build\outputs\apk
http://freebiesbug.com/psd-freebies/app-design/ PSD DESIGN
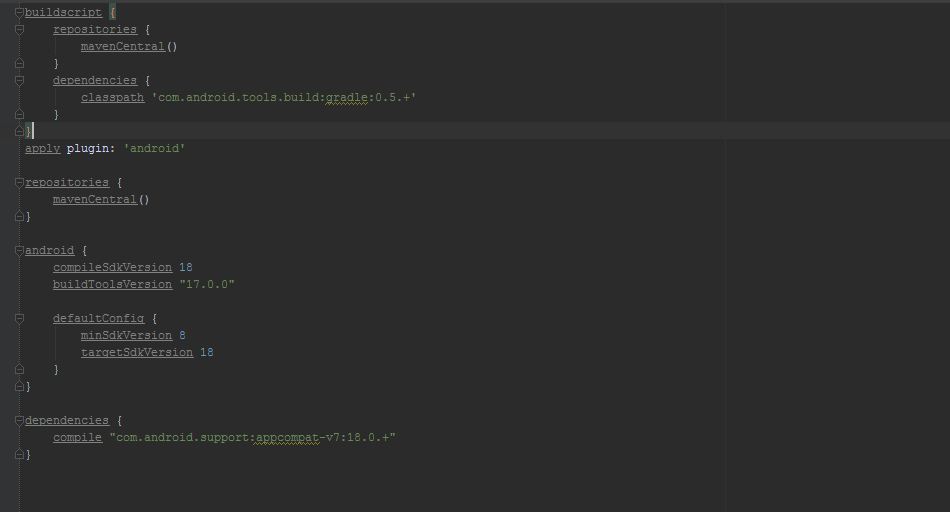
How to include support library?
Another great thing that announced in Google I/O 2013 is ActionBar Compat. I’m waiting it for a long time, because using “Sherlock ActionBar” is a little bit complicated. And now it’s released. Download it with your SDK Manager.
Then include it in your project. How? Because this is Gradle-based, it’s quite simple. Open “build.gradle” in your main project folder.
For Android-Support v4:
– It’s automatically included when you created new project. But if not, use second step.
– Add this line:
dependencies {
…
compile “com.android.support:support-v4:18.0.+”
}

For Android-Support v7:
– Add this line:
dependencies {
…
compile “com.android.support:appcompat-v7:18.0.+”
}
How tot test your app?
Just like Eclipse, Android Studio support 2 way of testing. By using AVD (Android Virtual Devices) or by real devices. To edit configurations, go to “Run” -> “Edit Configurations”. I recommend you to choose “Target Device” -> “Show chooser dialog”, to give you more freedom in testing.
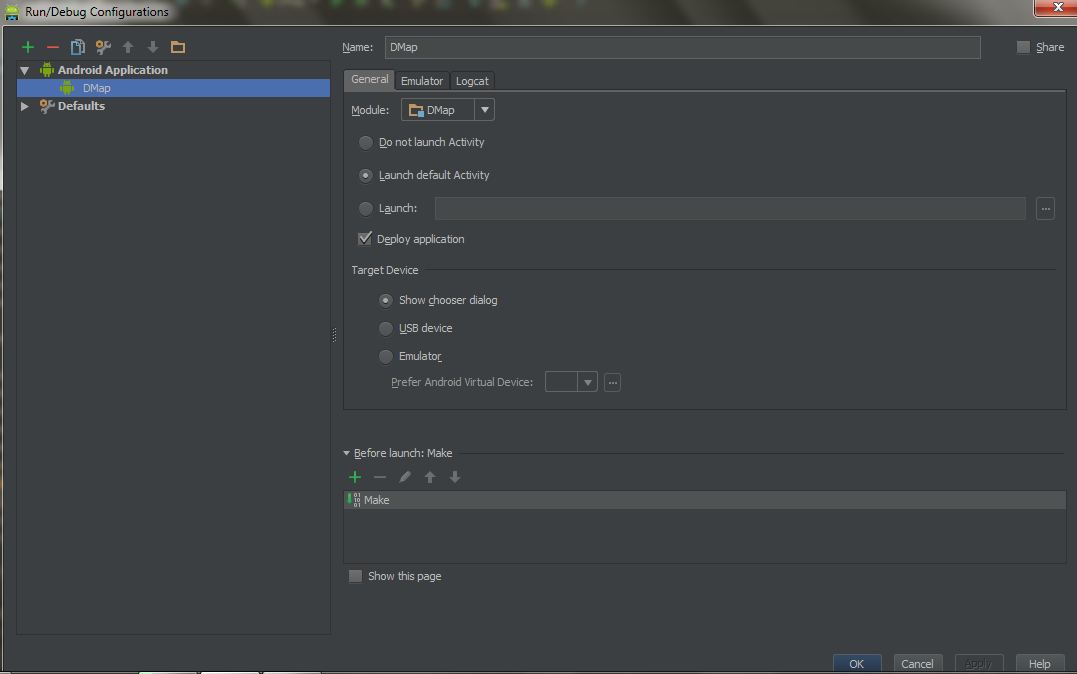
For AVD:
– You have to create at least one AVD. To create AVD, go to “Tools” -> “Android” -> “AVD Manager”
– In the chooser dialog, select AVD, and choose your devices.
For Real Device:
– You have to enable USB Debugging in your devices! Enable it, then go forward.
– Connect it through USB. In chooser dialog, you will see your device there.
Known issue: Sometimes the driver is not right. You should use Google USB Driver for testing app in Android. Or sometime, your device won’t be detected if it’s in sleep/locked mode.
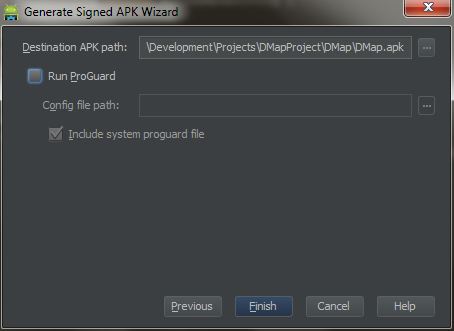
How to generate a signed APK?
This is also easy! Android Studio is provided with App-signing capability so you don’t have to open up your keytool or do somewhat-complicated task.
Here’s some steps:
– Go to “Build” -> “Generate Signed APK…”
– Click “Create new…”
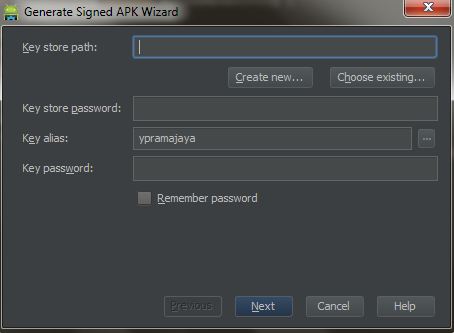
– To make a new keystore, just put a non-exist keystore in “Key store path:” (The folder MUST exist, while the file MUST NOT exist). And other details.
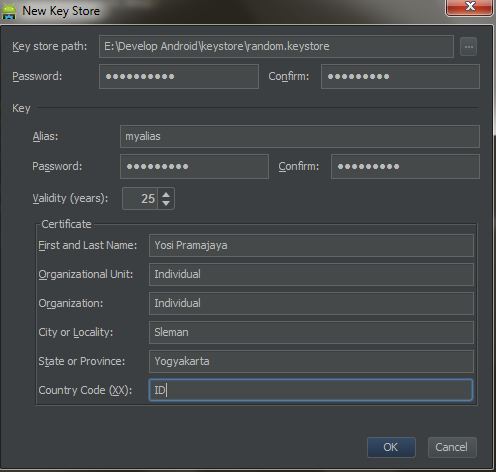
– It will automatically completed our last dialog in keystore. Just click “Next”
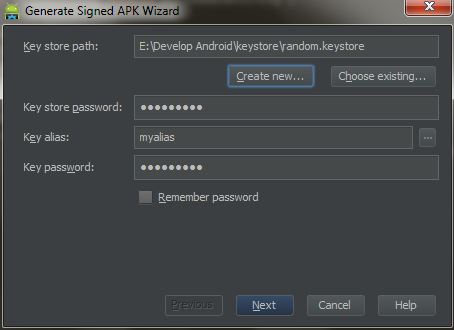
– And “Finish”
TIPS & TRICKS
If you want to change to Darcula Look and Feel, (in Windows) just press: “Ctrl + ~” -> “Switch Look and Feel” -> “Darcula”.
This look and feel is very interesting, and I like it so much.
-------------------------------------------------------------------------------
Facebook Android App like UI
--------------------------------------------------------------------------------------
android-fb-like-slideout-navigation at github
There's also a video demonstrating the library at work.
EDIT: Here's another library project:
https://github.com/darvds/RibbonMenu
Thanks Mr BuBBLs in comments!
Two more library project:
https://bitbucket.org/jfeinstein10/slidingmenu/overview
https://github.com/Gregadeaux/android-fly-in-app-navigation
If you know any other library projects doing this please leave a comment bellow or at the Google+ page!
Cyril Mottier has also written about implementing this pattern in his blog. These posts are very much worth reading:
The making of Prixing #1: Fly-in app menu
The making of Prixing #2: Swiping the fly-in app menu
The making of Prixing #3: Polishing the sliding app menu
See also the Prixing app on the Google Play to try out the side navigation implemented by Cyril.
AndroidStudioProjects\zoopmobile\app\build\outputs\apk
http://freebiesbug.com/psd-freebies/app-design/ PSD DESIGN
There are three ways to generate your build as per the
You can find the generated APK in your
---------------------------------------------------------------------------------buildType. (In your case, it's release but it can be named anything you want.)- Go to Gradle Task in right panel of Android Studio and search for
assembleReleaseorassemble(#your_defined_buildtype)under Module Tasks - Go to Build Variant in Left Panel and select the build from drop down
- Go to project root directory in File Explore and open cmd/terminal and run:
Linux:./gradlew assembleRelease or assemble(#your_defined_buildtype)
Windows:gradlew assembleRelease or assemble(#your_defined_buildtype)
You can find the generated APK in your
module/build directory having the build type name in it.
You can use this code
your-android-app/build/outputs/apk/your-android-app-release.apk
Complete Tutorial -> How To Generate Signed APK with Gradle Task
----------------------------------------------------------------------------------------
--------------------------------------------android {
...
signingConfigs {
release {
storeFile file("../your_key_store_file.jks")
storePassword "some_password"
keyAlias "alias_name"
keyPassword "key_password"
}
}
buildTypes {
release {
signingConfig signingConfigs.release
}
}
...
}gradle assembleReleaseyour-android-app/build/outputs/apk/your-android-app-release.apk
Complete Tutorial -> How To Generate Signed APK with Gradle Task
----------------------------------------------------------------------------------------
Android Studio error installing Gradle
Please read the log from:
Then I downloaded the full ZIP package from
- On Microsoft Windows:
[Windwos Drive]\Documents and Settings\[your username]\.AndroidStudioPreview\system\log - On Mac and Linux:
~/.AndroidStudioPreview/system/log/
gradle-1.6-bin.zip. For example, mine is:2013-05-17 09:42:16,934 [ 283002] INFO - ution.rmi.RemoteProcessSupport - Unzipping C:\Documents and Settings\Kiki.J.Hu\.gradle\wrapper\dists\gradle-1.6-bin\72srdo3a5eb3bic159kar72vok\gradle-1.6-bin.zip to C:\Documents and Settings\Kiki.J.Hu\.gradle\wrapper\dists\gradle-1.6-bin\72srdo3a5eb3bic159kar72vok
...
Caused by: com.intellij.openapi.externalSystem.model.ExternalSystemException: Could not install Gradle distribution from 'http://services.gradle.org/distributions/gradle-1.6-bin.zip'.
java.util.zip.ZipException: error in opening zip fileThen I downloaded the full ZIP package from
http://services.gradle.org/distributions/gradle-1.6-bin.zip manually and copied this ZIP package to:- Windows:
C:\Documents and Settings\Kiki.J.Hu\.gradle\wrapper\dists\gradle-1.6-bin\72srdo3a5eb3bic159kar72vok\ - Mac OS X:
~/.gradle/wrapper/dists/gradle-1.10-all/6vpvhqu0efs1fqmqr2decq1v12/
How to include support library?
Another great thing that announced in Google I/O 2013 is ActionBar Compat. I’m waiting it for a long time, because using “Sherlock ActionBar” is a little bit complicated. And now it’s released. Download it with your SDK Manager.
Then include it in your project. How? Because this is Gradle-based, it’s quite simple. Open “build.gradle” in your main project folder.
For Android-Support v4:
– It’s automatically included when you created new project. But if not, use second step.
– Add this line:
dependencies {
…
compile “com.android.support:support-v4:18.0.+”
}
For Android-Support v7:
– Add this line:
dependencies {
…
compile “com.android.support:appcompat-v7:18.0.+”
}
How tot test your app?
Just like Eclipse, Android Studio support 2 way of testing. By using AVD (Android Virtual Devices) or by real devices. To edit configurations, go to “Run” -> “Edit Configurations”. I recommend you to choose “Target Device” -> “Show chooser dialog”, to give you more freedom in testing.
For AVD:
– You have to create at least one AVD. To create AVD, go to “Tools” -> “Android” -> “AVD Manager”
– In the chooser dialog, select AVD, and choose your devices.
For Real Device:
– You have to enable USB Debugging in your devices! Enable it, then go forward.
– Connect it through USB. In chooser dialog, you will see your device there.
Known issue: Sometimes the driver is not right. You should use Google USB Driver for testing app in Android. Or sometime, your device won’t be detected if it’s in sleep/locked mode.
How to generate a signed APK?
This is also easy! Android Studio is provided with App-signing capability so you don’t have to open up your keytool or do somewhat-complicated task.
Here’s some steps:
– Go to “Build” -> “Generate Signed APK…”
– Click “Create new…”
– To make a new keystore, just put a non-exist keystore in “Key store path:” (The folder MUST exist, while the file MUST NOT exist). And other details.
– It will automatically completed our last dialog in keystore. Just click “Next”
– And “Finish”
TIPS & TRICKS
If you want to change to Darcula Look and Feel, (in Windows) just press: “Ctrl + ~” -> “Switch Look and Feel” -> “Darcula”.
This look and feel is very interesting, and I like it so much.
-------------------------------------------------------------------------------
Facebook Android App like UI
|
I did something like below:
  Below is my code for something like facebook side menu bar
Android sidebar like facebook or firefox |
Android Facebook style slide
Use SideNavigationView for side menu like facebook. But you will need a library for this which you can download from here "https://github.com/johnkil/SideNavigation".
Code for using it is:
All the best....
Code for using it is:
SideNavigationView  sideNavigationView;
sideNavigationView = (SideNavigationView)findViewById(R.id.side_navigation_view);
sideNavigationView.setMenuItems(R.menu.sliding);
sideNavigationView.toggleMenu();All the best....
Horizontal facebook style silder
Layout Animation Android[Facebook]
Technical implementation
The side navigation isn't (yet) included in the Android SDK. A quick search in github does reveal one project that has implemented the UI pattern.android-fb-like-slideout-navigation at github
There's also a video demonstrating the library at work.
EDIT: Here's another library project:
https://github.com/darvds/RibbonMenu
Thanks Mr BuBBLs in comments!
Two more library project:
https://bitbucket.org/jfeinstein10/slidingmenu/overview
https://github.com/Gregadeaux/android-fly-in-app-navigation
If you know any other library projects doing this please leave a comment bellow or at the Google+ page!
Cyril Mottier has also written about implementing this pattern in his blog. These posts are very much worth reading:
The making of Prixing #1: Fly-in app menu
The making of Prixing #2: Swiping the fly-in app menu
The making of Prixing #3: Polishing the sliding app menu
See also the Prixing app on the Google Play to try out the side navigation implemented by Cyril.
|
Ok After spending 2 days reading about similair problems and how
people solved them I finally was able to create the thing I wanted.
I was not able to do it with 2 diffrent XML files, but I doubt it is not
possible.
I did encountert some problems tho. After the first animation ended, the button was not clickable. This is because the animation shows that everything is moved but it does not update the layout, so the button is still at the position where the animation started. So I had to calculate the new position of the layout. I think I read somewhere that this is no longer an issue in 3.0, but correct me if I am wrong Another was that when I had my animation finally working the way I wanted my underlaying view did disapear before the animation was finished because I invoked view.setVisabilty(View.GONE);.
Now the problem was when I did not invoke that method, the animation
just hang for a second and then shooter to the end position of the
animation.
So I added a empty LinearLayout (can be anything) , Default property on
GONE, when the animation starts set it on Visible. when you revert the
animation, set it again to gone.
after doing this the animation was working the way I wanted.And if you are using a Rel, Linear, or any other layout. then you cant stack views in the Z order so you have to use an SurfaceView. so heres main.xml And the final result before Animation  after First Animation  And after the second Animation back to the left it states returns as the first Image. Al those posts that helped me really deserve some credit but I cant find any of them. Edit GIT https://bitbucket.org/maikelbollemeijer/sidepanelswitcher |
No comments:
Post a Comment