Search Google

Saturday 31 January 2015

portfolio website wordpress theme

portfolio website wordpress theme for actors musician

http://designscrazed.org/free-portfolio-wordpress-themes/

Snaps- free portfolio theme

Snaps is a free portfolio theme for WordPress perfect for showcasing portrait images and galleries.
Demo|Download

Snaps

Folder – WordPress Theme
Folder – WordPress Theme 
Sleek and responsive WordPress Theme perfect for showcase and business
This responsive theme its perfect for portfolio, product showcase and business comes with custom work posts to display your projects, at a quick glance:
  • Valid HTML 5
  • Responsive design
  • Custom Project posts
  • Custom admin panel
  • 5 different widgets included (video, lastest work, contact form, twitter feed, recent posts)
  • Lof and Flex slider
  • Feature posts or projects on home page
  • Google maps and contact form ready
  • Post formats
  • .PO for translation
  • and more

16. Travelify


 Travelify
Travelify is inspired by nature


http://colorlib.com/wp/best-full-screen-wordpress-themes/

http://colorlib.com/wp/financial-company-wordpress-themes/

Awesome Responsive Education WordPress Themes For Online Courses, Schools and Universities 2014 http://colorlib.com/wp/best-education-wordpress-themes/ 

 http://colorlib.com/wp/wordpress-themes-for-musicians/ 

BEST EVER http://themeforest.net/item/nilltone-multimedia-music-video-event-magazine/full_screen_preview/8019117?ref=cirvits 


http://colorlib.com/wp/best-business-wordpress-themes-for-startups/

Friday 30 January 2015

Chanakya Quotes

1) “दूसरो की गलतियों से सीखो अपने ही ऊपर प्रयोग करके सीखने को तुम्हारी  आयु कम पड़ेगी.”
2)”किसी भी व्यक्ति को बहुत ईमानदार (सीधा साधा ) नहीं होना चाहिए —सीधे वृक्ष और व्यक्ति पहले काटे जाते हैं.”


Chanakya Quotes:
3)”अगर कोई सर्प जहरीला नहीं है तब भी उसे जहरीला दिखना चाहिए वैसे डंस भले ही न दो पर डंस दे सकने की क्षमता का दूसरों को अहसास करवाते रहना चाहिए. ”
4)”हर मित्रता के पीछे कोई स्वार्थ जरूर होताहै –यह कडुआ सच है.”


Chanakya Niti in Hindi


5)”कोई भी काम शुरू करने के पहले तीन सवाल अपने आपसे पूछो —मैं ऐसा क्यों करने जा रहा हूँ ? इसका क्या परिणाम होगा ? क्या मैं सफल रहूँगा ?”
6)”भय को नजदीक न आने दो अगर यह नजदीक आये इस पर हमला करदो यानी भय से भागो मत इसका सामना करो .”


Chanakya Quotes in Hindi:
7)”दुनिया की सबसे बड़ी ताकत पुरुष का विवेक और महिला की सुन्दरता है.”
8)”काम का निष्पादन करो , परिणाम से मत डरो.”
9)”सुगंध का प्रसार हवा के रुख का मोहताज़ होता है पर अच्छाई सभी दिशाओं में फैलती है.”
10)”ईश्वर चित्र में नहीं चरित्र में बसता है अपनी आत्मा को मंदिर बनाओ.”
11) “व्यक्ति अपने आचरण से महान होता है जन्म से नहीं.”


Chanakya Quotes: Chanakya Quotes in Hindi
12) “ऐसे व्यक्ति जो आपके स्तर से ऊपर या नीचे के हैं उन्हें दोस्त न बनाओ,वह तुम्हारे कष्ट का कारण बनेगे. सामान स्तर के मित्र ही सुखदाई होते हैं .”
13) “अपने बच्चों को पहले पांच साल तक खूब प्यार करो. छः साल से पंद्रह साल तक कठोर अनुशासन और संस्कार दो .सोलह साल से उनके साथमित्रवत व्यवहार
करो.आपकी संतति ही आपकी सबसे अच्छी मित्र है.”
14) “अज्ञानी के लिए किताबें और अंधे के लिए दर्पण एक सामान उपयोगी है .”
15) “शिक्षा सबसे अच्छी मित्र है. शिक्षित व्यक्ति सदैव सम्मान पाता है. शिक्षा की शक्ति के आगे युवा शक्ति और सौंदर्य दोनों ही कमजोर है.


Thursday 29 January 2015

add slider show banner on magento

http://www.magentocommerce.com/magento-connect/dolphin-responsive-slideshow.html
connect :
http://connect20.magentocommerce.com/community/Dolphin_Slideshow
log out and login again,

add slider show banner on magento


put the code
{{block type=”slideshow/slideshow” template=”slideshow/slideshow.phtml”}}
to home page content.
system > configuration > left slide show > enable and config size and will see it
*****
important !@!
***
if the menu can not drop down, then there will be the conflict.
solution is :
add below code to the jquery js in /public_html/js/slideshow/jeuery**.js
it will work
<script type="text/javascript"> jQuery.noConflict(); var $j = jQuery; </script>

all about magento and mail

 http://thenewcreator.blogspot.in/2014/08/all-solution-of-magento.html
 Mail Server Settings for Hotmail using the Microsoft Outlook Connector

If you are using Microsoft Outlook & the Outlook Connector, you can define your Hotmail account just like any regular POP3 email account:
    Hotmail Incoming Mail Server (POP3) - pop3.live.com (logon using Secure Password Authentification - SPA, mail server port: 995)
    Hotmail Outgoing Mail Server (SMTP) - smtp.live.com (TLS enabled, port 587)
  • Yahoo! Mail Settings

  • Yahoo Mail offers standard POP3 access for receiving emails incoming through your Yahoo mailbox, by using your favorite email client software. To setup your email client for working with your Yahoo account, you need to select the POP3 protocol and use the following mail server settings:
      Yahoo Incoming Mail Server (POP3) - pop.mail.yahoo.com (SSL enabled, port 465)
      Yahoo Outgoing Mail Server (SMTP) - smtp.mail.yahoo.com (SSL enabled, port 995)
    POP Yahoo! Mail Plus email server settings
      Yahoo Plus Incoming Mail Server (POP3) - plus.pop.mail.yahoo.com (SSL enabled, port 995)
      Yahoo Plus Outgoing Mail Server (SMTP) - plus.smtp.mail.yahoo.com (SSL enabled, port 465, use authentication)
  • Google GMail Settings

  • The Google GMail service offers email client access for retrieving and sending emails through your Gmail account. However, for security reasons, GMail uses POP3 over an SSL connection, so make sure your email client supports encrypted SSL connections.
      Google Gmail Incoming Mail Server (POP3) - pop.gmail.com (SSL enabled, port 995)
      Outgoing Mail Server - use the SMTP mail server address provided by your local ISP or smtp.gmail.com (TLS enabled, port 587)
  • For Outlook.com: see Outlook.com Mail Server Settings

  • MSN Mail Settings

  • The MSN email service allows you to use the MSN POP3 and SMTP servers to access your MSN mailbox.
      MSN Incoming Mail Server (POP3) - pop3.email.msn.com (port 110, using Secure Password Authentication - SPA)
      MSN Outgoing Mail Server - smtp.email.msn.com (select "My outgoing server requires authentication")
  • Lycos Mail Settings

  • The Lycos Mail Plus service allows you to use POP3 and SMTP servers for accessing your Lycos mailbox.
      Lycos Mail Incoming Mail Server (POP3) - pop.mail.lycos.com (port 110)
      Outgoing Mail Server - smtp.mail.lycos.com or use your local ISP SMTP mail server
  • AOL Mail Settings

  • The AOL email service is a web based system, designed for managing your AOL mailbox via HTTP IMAP access. Unlike Hotmail, you can use any email client to access your AOL mailbox, as long as it supports the IMAP protocol.
      AOL Incoming Mail Server (IMAP) - imap.aol.com (port 143)
      AOL Outgoing Mail Server - smtp.aol.com or use your local ISP SMTP mail server
  • Mail.com Mail Settings

  • The Mail.com email service allows you to use POP3 and SMTP servers for accessing your Mail.com mailbox.
      Mail.com Mail Incoming Mail Server (POP3) - pop1.mail.com (port 110)
      Outgoing Mail Server - use your local ISP SMTP mail server
  • Netscape Internet Service Mail Settings

  • The Netscape e-mail system is web-based, which means you can access their e-mail from any Internet connection. Netscape Internet Service also supports AOL® Communicator, Microsoft® Outlook, Microsoft® Outlook Express, and other POP3 e-mail software. The outgoing mail server needs SSL support, so make sure your email client software supports SSL connections over the SMTP protocol.
      Netscape Internet Service Incoming Mail Server (POP3) - pop.3.isp.netscape.com (port 110)
      Netscape Internet Service Outgoing Mail Server - smtp.isp.netscape.com (port 25, using a secure SSL connection)
  • Tiscali Mail Settings

  • The Tiscali email service allows you to use POP3 and SMTP servers for accessing your Tiscali mailbox.
      Tiscali Incoming Mail Server (POP3) - pop.tiscali.com (port 110)
      Outgoing Mail Server - use your local ISP SMTP mail server
  • Freeserve Mail Settings

  • The Freeserve email service allows you to use POP3 and SMTP servers for accessing your Freeserve mailbox.
      Freeserve Incoming Mail Server (POP3) - pop.freeserve.com (port 110)
      Outgoing Mail Server - use your local ISP SMTP mail server
  • Supanet Mail Settings

  • The Supanet email service allows you to use POP3 and SMTP servers for accessing your Supanet mailbox.
      Supanet Incoming Mail Server (POP3) - pop.supanet.com (port 110)
      Outgoing Mail Server - use your local ISP SMTP mail server
     
    -----------------------------------------------------------------------------------------------------------------------------------------

    How to configure Gmail SMTP settings

    If you want to use SMTP e-mail configuration and you wonder how to set it up with a Gmail account, use the following settings:

    SMTP Server: tls://smtp.gmail.com
    SMTP Port: 465
    tick Use SMTP authentification
    tick SMTP TLS/SSL

    + insert you own login credentials (username and password)
     
    Here is a sample screenshot of setting up Gmail SMTP in Affiliate tracking software:


    OR
     

    • Gmail SMTP server address: smtp.gmail.com
    • Gmail SMTP user name: Your full Gmail address (e.g. example@gmail.com)
    • Gmail SMTP password: Your Gmail password
    • Gmail SMTP port (TLS)587
      • Gmail SMTP port (SSL): 465
    • Gmail SMTP TLS/SSL required: yes

     
    ---------------------------------------------------------------------------------

    Store Configuration in the Magento Admin
    The next step is to create the web sites. To do so, go to System->Manage Stores->Create Website. Write in Name the domain of your new site and in Code the code Magento will use to call this site. In our case
    image
    Once the website has been created, we’ll create the store corresponding to this website by clicking on the “Create Store” button in System -> Manage Stores. Website is the website to which this store will be associated, Name is the same as Website, and Root Category is the root category that will be used for this store.
    image
    Finally, we'll create the store view which is the interface that the customer will be able to access on the frontend.  Click the “Create Store View” button in System -> Manage Stores. Store is store to which this view will be associated, Name is name of this store view, Code is code for this store view and Status allows you to enabled this store view, being accessible from our frontend, otherwise, it will not be accessible.
    image
    After the Store has been created, you need to configure the Unsecure Base URL and Secure Base URL under System -> Configuration -> General -> Web.  Before setting their respective base URLs, ensure that the configuration scope is set to the domain1.com website to define which site you are working on.
    image
    Then, modify the base URLs for both Unsecure:
    image

    and Secure:
    image
    with the corresponding domain name by unchecking the ”Use default [STORE VIEW]” checkbox and then save the configuration.
    Now just repeat the steps above for the other website, domain2.com.
    Apache Server Configuration
    Now, we have to configure Magento configuration files for Apache to use Virtual Hosts and the htaccess file to redirect depending on the domain.

     --------------------------------------------------------------------------------------
    To configure your store email adresses, look in the left side of the page for a navigation frame like the one below. Click the section named "Store email addresses".
    step8.png
    Enter the names of the departments that you have and the emails addresses associated with them. These need to be real email accounts, as these addresses will be the ones your customers will see. Click on "Save Config" when you are done.
    step9.png
    Next step is to configure Magento to send all store email through your Gmail/Google Apps account. Look in the navigation section again and find the section called "System".
    step10.png
    Inside "SMTP Pro Email General Settings", choose "Google Apps/Gmail" as your extension option and change "Use Store Email Addresses for Reply-to" to yes. You can also set "Log all messages" to yes if you would like to save all sent emails to the Magento email log. This setting does not affect the emails on your inbox.
    Also, inside "SMTP Pro Email Google Apps/Gmail Settings" you have to enter your Gmail account information email and password. Click on "Save Config" when you are done.
    step11.png
    To test that everything is working properly, locate a button labeled "Run Self Test" in the above screen. If you click it, a test email will be sent to your account. You can check the email log at any time at System > Tools > Email log.

    step12.png 
     ===================================================
    Firstly, you need to ensure your domain is pointed to our nameservers:
    • ns.123-reg.co.uk
    • ns2.123-reg.co.uk
    If the domain is not pointed to the 123-reg nameservers, you will be unable to manage them from the 123-reg control panel.
    For more information on changing your nameservers please view the following article:
    How do I change the nameservers for my domain name?
    1 Login to your 123-reg control panel.
     Control_Panel_Login.jpg
    2 In the Domain names section, select the relevant domain name in the drop-down list and click on the Manage button.
     Domain_section_domain_select.jpg
    3 Click on the Manage DNS icon under the Advanced domain settings section.
     Manage DNS.jpg
    4 Click on the Advanced DNS tab.
    5 Now delete any existing MX records by clicking on delete buttons next to the records you wish to delete.
    6 Enter the new A record that will resolve your MX record to an IP address and click the Add New Entry button.
    7 Enter the new MX Record and click the Add New Entry button.

    Wednesday 28 January 2015

    full code and plugins for magento slider

    <!--Image Slider Start-->
    <div id="slide" align="center">
    <script type="text/javascript">// <![CDATA[
    var image1=new Image()
    image1.src="{{skin url=images/media/slideshow/1.jpg}}"
    var image2=new Image()
    image2.src="{{skin url=images/media/slideshow/2.jpg}}"
    var image3=new Image()
    image3.src="{{skin url=images/media/slideshow/3.jpg}}"
    var image4=new Image()
    image4.src="{{skin url=images/media/slideshow/4.jpg}}"
    var image5=new Image()
    image5.src="{{skin url=images/media/slideshow/5.jpg}}"
    // ]]></script>
    <a href="http://www.myhomendeco.com/index.php/bed-rooms.html"> <img src="{{skin url=images/1.jpg}}" alt="" name="slide" width="900" height="277" border="2" /></a>
    <script type="text/javascript">// <![CDATA[
    //variable that will increment through the images
    var step=1
    function slideit(){
    //if browser does not support the image object, exit.
    if (!document.images)
    return
    document.images.slide.src=eval("image"+step+".src")
    if (step<3)
    step++
    else
    step=1
    //call function "slideit()" every 2.5 seconds
    setTimeout("slideit()",5000)
    }
    slideit()
    // ]]></script>
    </div>
    <!--Image Slider End-->


    Step 2: Go to below folder
    skin/frontend/default/Your_theme/images/media/
    create a folder(name:slideshow)
    put 5 image files(give name 1.jpg,2.jpg,3.jpg,4.jpg,5.jpg)
    and reload

    meanwhile refresh and flush you magento cache
    http://freemagento.blogspot.in/2013/08/magic-constant-in-php.html?view=sidebar
    -------------------------------------------------
    I am using "pagayo theme" extension. My site is "http://needit.co.in"
    http://www.magentocommerce.com/magento-connect/free-theme-electronics-online-by-pagayo.html

    http://www.magentocommerce.com/magento-connect/free-theme-jewelry-by-pagayo.html

    http://www.magentocommerce.com/magento-connect/free-theme-women-fashion-by-pagayo.html
    ...............................................
    SLIDER PLUGIN FOR MAGENTO

    Good http://www.magentocommerce.com/magento-connect/dolphin-responsive-slideshow.html

     http://www.magentocommerce.com/magento-connect/responsive-banner-slider.html

    ...............
    https://midpart.wordpress.com/2009/12/19/add-a-image-slider-banner-in-magento-home-page/


    Sunday 25 January 2015

    ionic installation on windows 7 & 8

    Installing Android and Cordova dependencies for Ionic Development 

     http://learn.ionicframework.com/videos/windows-android/ 

    http://www.hongkiat.com/blog/mobile-frameworks/ 


    Hassle Free Installationof Ionic Framework on Windows 7,8 Platform

    Requirement:
    1.     Java : install java
    Go to https://java.com/en/download/   and install java
    Preferable Location:
    C:\Program Files\Java
    Rename package to JDK(instead of jdk_version) and java will ask you for JRE location install in same folder
    2.     Apache ant: install Apache ant binary distribution
    apache-ant-1.9.4-bin binary distribution
    Preferable Location:
    C:\apache-ant-1.9.4
    3.     Nodejs : install nodejs
    Go to http://nodejs.org/ and install nodejs
    Preferable Location:
    C:\Program Files\nodejs
    4.     Android SDK: install Android SDK not Android Studio
    Go to http://developer.android.com/sdk/index.html and download install SDK (Install Stand Alone SDK)
    Preferable Location:
    C:\Program Files\Android
    Go to C:\Program Files\Android\android-sdk
    Right click on SDK manager, and Run As Administarator
    Otherwise go to command prompt and type “android”
    It will show you SDK manager
     
     
    5.     Cordova:
    Open command prompt and type
    npm install –g cordova
    it will install cordova package on machine
    6.     Ionic
    Open command prompt  and type
    npm install –g ionic
    it will install ionic on system
    Well Upto This You have Everything Installed on your machine
    Now next part in adding and checking Environment variables for all above locations.
    I just like to write this part separately because It will help you to Install everything without any problem and you can start building projects in ionic .
    Environment variable:
    Right click mycomputer
    Properties
    Advance system setting
    Environment variable (USER VARIABLES NOT SYSTEM VARIABLES)
             
    Click on  New and Add as follow:
    Variable name: ANDROID_HOME
    Variable value: C:\Program Files\Android;C:\Program Files\Android\android-sdk\;C:\Program Files\Android\android-sdk\platforms;C:\Program Files\Android\android-sdk\platform-tools;C:\Program Files\Android\android-sdk\tools;
    Click on  New and Add as follow:
    Variable name: JAVA_HOME
    Variable value: C:\Program Files\Java\jdk7 (please Note do not include semicolon
    at the end of the line like “;”)
    Then Edit Path and add Following values :
    C:\Program Files\nodejs;C:\Program Files\nodejs\node_modules\npm;C:\Program Files\Android;C:\Program Files\Android\android-sdk;C:\Program Files\Android\android-sdk\platforms;C:\Program Files\Android\android-sdk\platform-tools;C:\Program Files\Android\android-sdk\tools;C:\Program Files\Android\android-sdk\platforms\android-19;C:\Program Files\Android\android-sdk\platforms;C:\Program Files\Android\android-sdk\platform-tools;C:\Program Files\Java\jdk7\bin;C:\Program Files\Android\android-sdk\tools;C:\apache-ant-1.9.4\bin;C:\Program Files\nodejs;C:\Program Files\Android\android-sdk\system-images;


    Friday 23 January 2015

    Post to your Facebook wall using Javascript SDK

    Post to your Facebook wall using Javascript SDK

    Step1:
    1
    2
    3
    4
    5
    <div id="fb_div">
        <h3>Post to your Facebook wall:</h3> <br />
        <textarea id="fb_message" name="fb_message" cols="70" rows="7"></textarea> <br />
        <input type="button" value="Post on Wall" onClick="post_on_wall();" />
    </div>
    Step 2:
    1
    2
    3
    4
    5
    6
    7
    8
    9
    10
    11
    12
    13
    14
    15
    16
    17
    18
    19
    20
    21
    22
    23
    24
    25
    26
    27
    28
    29
    30
    31
    32
    33
    34
    35
    36
    37
    38
    39
    40
    41
    42
    43
    44
    45
    46
    47
    48
    49
    window.fbAsyncInit = function()
    {
        FB.init({
            appId  : 'xxxxxxxxxxxxxxx',
            status : true, // check login status
            cookie : true, // enable cookies to allow the server to access the session
            xfbml  : true , // parse XFBML
            oauth : true // Enable oauth authentication
        });
     
     
    };
     
    function post_on_wall()
    {
        FB.login(function(response)
        {
            if (response.authResponse)
            {
                alert('Logged in!');
     
                // Post message to your wall
     
                var opts = {
                    message : document.getElementById('fb_message').value,
                    name : 'Post Title',
                    link : 'www.postlink.com',
                    description : 'post description',
                };
     
                FB.api('/me/feed', 'post', opts, function(response)
                {
                    if (!response || response.error)
                    {
                        alert('Posting error occured');
                    }
                    else
                    {
                        alert('Success - Post ID: ' + response.id);
                    }
                });
            }
            else
            {
                alert('Not logged in');
            }
        }, { scope : 'publish_stream' });
    }
    Step3:
    create a div with id=”fb-root” and paste below code after this div
    1
    <div id="fb-root"></div>
    Step4:
    1
    2
    3
    4
    5
    6
    7
    8
    (function() {
        var e = document.createElement('script');
        // replacing with an older version until FB fixes the cancel-login bug
        e.src = document.location.protocol + '//connect.facebook.net/en_US/all.js';
        //e.src = 'scripts/all.js';
        e.async = true;
        document.getElementById('fb-root').appendChild(e);
    }());

    Tuesday 20 January 2015

    all about android studio and android design like facebook

     find your apk file in :-
    AndroidStudioProjects\zoopmobile\app\build\outputs\apk

    http://freebiesbug.com/psd-freebies/app-design/   PSD DESIGN

    There are three ways to generate your build as per the buildType. (In your case, it's release but it can be named anything you want.)
    1. Go to Gradle Task in right panel of Android Studio and search for assembleRelease or assemble(#your_defined_buildtype) under Module Tasks
    2. Go to Build Variant in Left Panel and select the build from drop down
    3. Go to project root directory in File Explore and open cmd/terminal and run:
      Linux: ./gradlew assembleRelease or assemble(#your_defined_buildtype)
      Windows: gradlew assembleRelease or assemble(#your_defined_buildtype)
    If you want to do a release build (only), you can use Build > Generate Signed apk. For other build types, only the above three options are available.
    You can find the generated APK in your module/build directory having the build type name in it.
     ---------------------------------------------------------------------------------
    You can use this code
    android {
       ...
    signingConfigs {
            release {
                storeFile file("../your_key_store_file.jks")
                storePassword "some_password"
                keyAlias "alias_name"
                keyPassword "key_password"
            }
        }
    
        buildTypes {
    
            release {
                signingConfig signingConfigs.release
            }
        }
    
    
       ...
    }
    then from your terminal run
    gradle assembleRelease
    you will get the apk at
    your-android-app/build/outputs/apk/your-android-app-release.apk
    Complete Tutorial -> How To Generate Signed APK with Gradle Task
    ----------------------------------------------------------------------------------------

    Android Studio error installing Gradle


    Please read the log from:
    • On Microsoft Windows: [Windwos Drive]\Documents and Settings\[your username]\.AndroidStudioPreview\system\log
    • On Mac and Linux: ~/.AndroidStudioPreview/system/log/
    And you will find the tmp download path of gradle-1.6-bin.zip. For example, mine is:
    2013-05-17 09:42:16,934 [ 283002]   INFO - ution.rmi.RemoteProcessSupport - Unzipping C:\Documents and Settings\Kiki.J.Hu\.gradle\wrapper\dists\gradle-1.6-bin\72srdo3a5eb3bic159kar72vok\gradle-1.6-bin.zip to C:\Documents and Settings\Kiki.J.Hu\.gradle\wrapper\dists\gradle-1.6-bin\72srdo3a5eb3bic159kar72vok 
    ...
    Caused by: com.intellij.openapi.externalSystem.model.ExternalSystemException: Could not install Gradle distribution from 'http://services.gradle.org/distributions/gradle-1.6-bin.zip'.
    java.util.zip.ZipException: error in opening zip file
    So I know the cause: I downloaded an incomplete ZIP package.
    Then I downloaded the full ZIP package from http://services.gradle.org/distributions/gradle-1.6-bin.zip manually and copied this ZIP package to:
    • Windows: C:\Documents and Settings\Kiki.J.Hu\.gradle\wrapper\dists\gradle-1.6-bin\72srdo3a5eb3bic159kar72vok\
    • Mac OS X: ~/.gradle/wrapper/dists/gradle-1.10-all/6vpvhqu0efs1fqmqr2decq1v12/
    Everything is OK now.
     
     --------------------------------------------


    How to include support library?
    Another great thing that announced in Google I/O 2013 is ActionBar Compat. I’m waiting it for a long time, because using “Sherlock ActionBar” is a little bit complicated. And now it’s released. Download it with your SDK Manager.
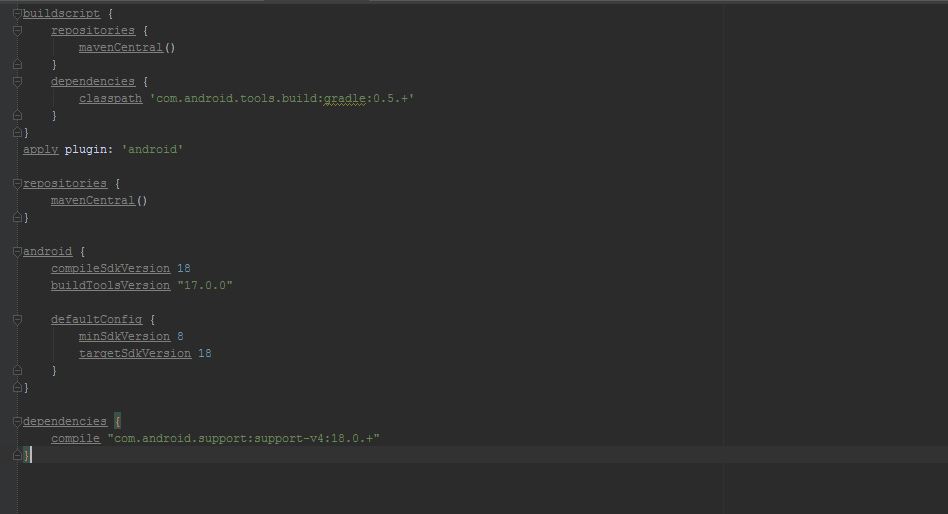
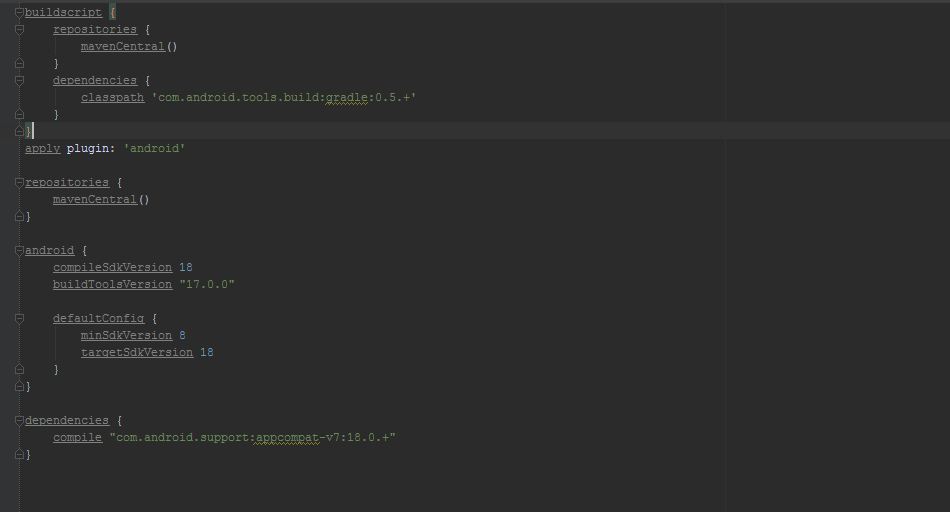
    Then include it in your project. How? Because this is Gradle-based, it’s quite simple. Open “build.gradle” in your main project folder.
    For Android-Support v4:
    – It’s automatically included when you created new project. But if not, use second step.
    – Add this line:
    dependencies {

    compile “com.android.support:support-v4:18.0.+”
    }


    For Android-Support v7:
    – Add this line:
    dependencies {

    compile “com.android.support:appcompat-v7:18.0.+”
    }


    How tot test your app?
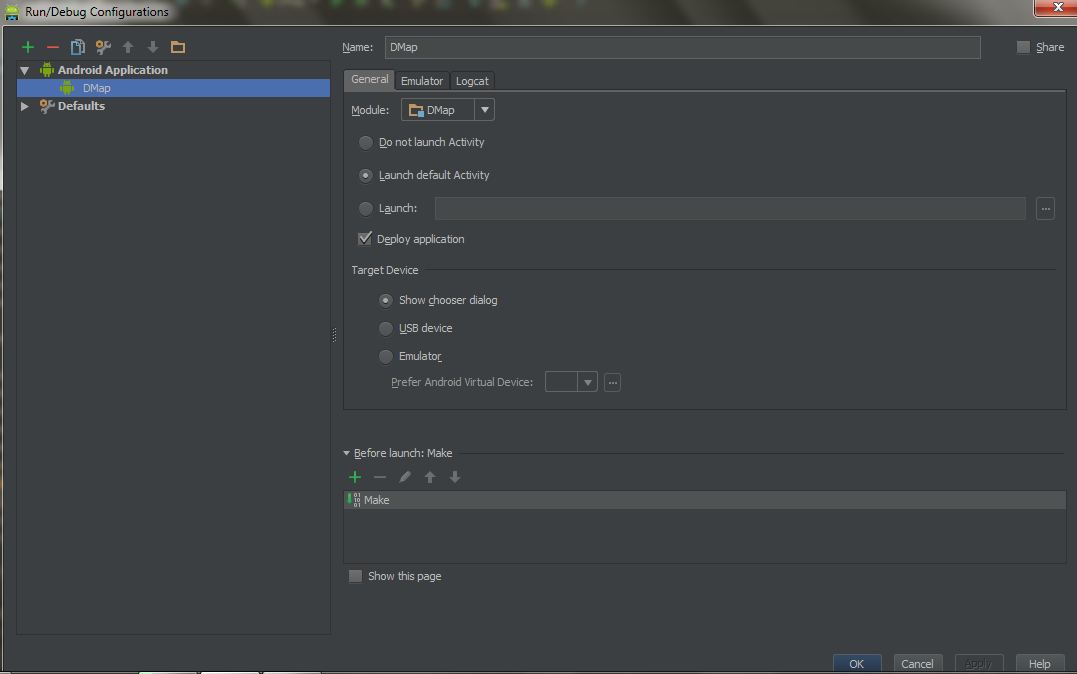
    Just like Eclipse, Android Studio support 2 way of testing. By using AVD (Android Virtual Devices) or by real devices. To edit configurations, go to “Run” -> “Edit Configurations”. I recommend you to choose “Target Device” -> “Show chooser dialog”, to give you more freedom in testing.

    For AVD:
    – You have to create at least one AVD. To create AVD, go to “Tools” -> “Android” -> “AVD Manager”
    – In the chooser dialog, select AVD, and choose your devices.
    For Real Device:
    – You have to enable USB Debugging in your devices! Enable it, then go forward.
    – Connect it through USB. In chooser dialog, you will see your device there.
    Known issue: Sometimes the driver is not right. You should use Google USB Driver for testing app in Android. Or sometime, your device won’t be detected if it’s in sleep/locked mode.

    How to generate a signed APK?
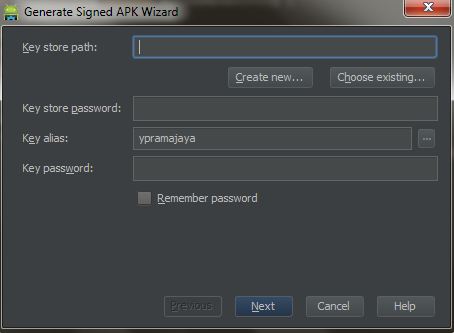
    This is also easy! Android Studio is provided with App-signing capability so you don’t have to open up your keytool or do somewhat-complicated task.
    Here’s some steps:
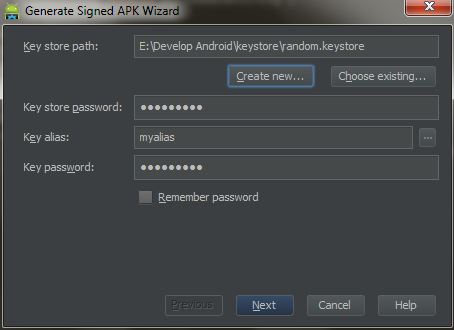
    – Go to “Build” -> “Generate Signed APK…”
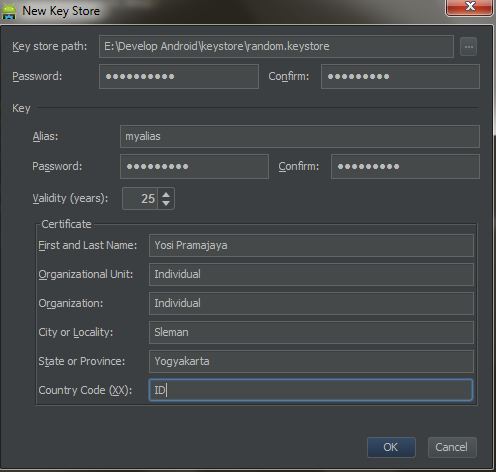
    – Click “Create new…”

    – To make a new keystore, just put a non-exist keystore in “Key store path:” (The folder MUST exist, while the file MUST NOT exist). And other details.

    – It will automatically completed our last dialog in keystore. Just click “Next”

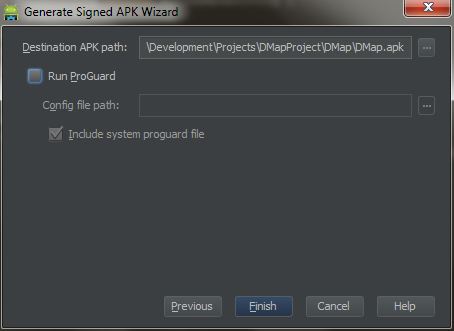
    – And “Finish”


    TIPS & TRICKS
    If you want to change to Darcula Look and Feel, (in Windows) just press: “Ctrl + ~” -> “Switch Look and Feel” -> “Darcula”.
    This look and feel is very interesting, and I like it so much.

    -------------------------------------------------------------------------------
    Facebook Android App like UI


    I did something like below: enter image description here
    enter image description here
    Below is my code for something like facebook side menu bar
    1. I put 2 views overlap in a frame layout. The bottom view is the menu, the top view is the content body.
    2. And I put the content body into a horizantal scroll view. I also put a view to the left of the content body in the horizantal scroll view. And set the view's background as transparent.
    3. Then scroll to content body at begining. So the side menu bar is blocked by the content body.
    4. When click a button to show the menu, I scroll the horizantal scroll view to show the transparent placeholder. Then the menu will show up since it is under the transparent placeholder now.
    I did not use XML for the interface. I create everything in the below code. I think it should be easy to read and put into your eclipse.
    package com.chaoshen.androidstudy.facebooklikesidemenubar;
    
    
    import android.os.Bundle;
    import android.app.Activity;
    import android.graphics.Color;
    import android.view.Display;
    import android.view.MotionEvent;
    import android.view.View;
    import android.view.View.OnClickListener;
    import android.view.ViewGroup.LayoutParams;
    import android.widget.Button;
    import android.widget.FrameLayout;
    import android.widget.HorizontalScrollView;
    import android.widget.LinearLayout;
    import android.widget.TextView;
    
    public class MainActivity extends Activity{
    
        private boolean Menu_Displayed=false;
    
        @Override
        public void onCreate(Bundle savedInstanceState) {
            super.onCreate(savedInstanceState);
    
            Display display = getWindowManager().getDefaultDisplay();
            final int width = display.getWidth();
    
            // menu:
            LinearLayout li_menu = new LinearLayout(this);
            li_menu.setLayoutParams(new LayoutParams(LayoutParams.FILL_PARENT, LayoutParams.FILL_PARENT));  
            li_menu.setOrientation(1);//1 is vertical
            li_menu.setBackgroundColor(Color.GREEN);
    
            Button btn1 = new Button(this);
            btn1.setText("button 1");
            btn1.setLayoutParams(new LayoutParams(LayoutParams.WRAP_CONTENT, LayoutParams.WRAP_CONTENT));  
    
            li_menu.addView(btn1);
    
            //body:
            final HorizontalScrollView hsv = new HorizontalScrollView(this){
                @Override
                // do not let hsv consume the click itself. Then the view under the hsv will also consume the click
                //so that the menu will be clicked
                //when menu is not showed up, let hsv be the only view to consume the click.
                //so that the menu will not be clicked
                public boolean onTouchEvent(MotionEvent ev) {
                    if(Menu_Displayed){
                        return false;
                    }
                    else{
                        return true;
                    }
                }
            };
            hsv.setLayoutParams(new LayoutParams(LayoutParams.FILL_PARENT, LayoutParams.FILL_PARENT));  
            hsv.setBackgroundColor(Color.TRANSPARENT);
            hsv.setHorizontalFadingEdgeEnabled(false);
            hsv.setVerticalFadingEdgeEnabled(false);
    
            final LinearLayout li_body = new LinearLayout(this);
            li_body.setLayoutParams(new LayoutParams(LayoutParams.WRAP_CONTENT, LayoutParams.FILL_PARENT));  
            li_body.setOrientation(0);//0 is horizantal
            li_body.setBackgroundColor(Color.TRANSPARENT);
    
            hsv.addView(li_body);
    
            //body: place holder transparent
            TextView placeholder = new TextView(this);
            placeholder.setTextColor(Color.TRANSPARENT); 
            placeholder.setLayoutParams(new LayoutParams(width-100, LayoutParams.FILL_PARENT));  
            placeholder.setVisibility(View.INVISIBLE);
            li_body.addView(placeholder);
    
            //body: real content
            LinearLayout li_content = new LinearLayout(this);
            li_content.setLayoutParams(new LayoutParams(width, LayoutParams.FILL_PARENT));  
            li_content.setOrientation(1);//1 is vertical
            li_content.setBackgroundColor(Color.CYAN);
    
            TextView tv1 = new TextView(this);  
            tv1.setText("txt 1");  
            tv1.setTextSize(40);  
            tv1.setTextColor(Color.BLACK);  
    
            TextView tv2 = new TextView(this);  
            tv2.setLayoutParams(new LayoutParams(LayoutParams.FILL_PARENT, LayoutParams.WRAP_CONTENT));  
            tv2.setTextSize(50);  
            tv2.setText("txt 2");  
            tv2.setTextColor(Color.WHITE);  
    
            //use this button to scroll
            Button btn_showMenu = new Button(this);
            btn_showMenu.setText("Menu");
            btn_showMenu.setLayoutParams(new LayoutParams(LayoutParams.WRAP_CONTENT, LayoutParams.WRAP_CONTENT));
            btn_showMenu.setOnClickListener(new OnClickListener() {
    
                @Override
                public void onClick(View v) {
                    hsv.post(new Runnable() {
    
                        @Override
                        public void run() {
                            if(Menu_Displayed){
                                hsv.smoothScrollTo(width-100, 0);
                            }
                            else{
                                hsv.smoothScrollTo(0, 0);
                            }
                            Menu_Displayed = !Menu_Displayed;
                        }
                    });
                }
            });
    
            li_content.addView(tv1);
            li_content.addView(tv2);
            li_content.addView(btn_showMenu);
    
            li_body.addView(li_content);
    
            //add menu and body in to frame
            FrameLayout mainFrame = new FrameLayout(this);  
            mainFrame.setLayoutParams(new LayoutParams(LayoutParams.FILL_PARENT, LayoutParams.FILL_PARENT));  
            mainFrame.addView(li_menu);  
            mainFrame.addView(hsv);  
    
            //scroll to the body real content to block the menu
            hsv.post(new Runnable() {
    
                @Override
                public void run() {
                    hsv.scrollBy(width-100, 0);             
                }
            });
    
            setContentView(mainFrame);         
        }
    }
     
     
     BEST CODE FOR SLIDER http://www.androidhive.info/2013/11/android-sliding-menu-using-navigation-drawer/


    Android sidebar like facebook or firefox

     
     --------------------------------------------------------------------------------------

    Android Facebook style slide


    Use SideNavigationView for side menu like facebook. But you will need a library for this which you can download from here "https://github.com/johnkil/SideNavigation".
    Code for using it is:
    SideNavigationView  sideNavigationView;
    sideNavigationView = (SideNavigationView)findViewById(R.id.side_navigation_view);
    sideNavigationView.setMenuItems(R.menu.sliding);
    sideNavigationView.toggleMenu();
    Now, make menu you want to show in Slide menu.
    All the best....

    Horizontal facebook style silder

    Layout Animation Android[Facebook]


    Technical implementation

    The side navigation isn't (yet) included in the Android SDK. A quick search in github does reveal one project that has implemented the UI pattern.

    android-fb-like-slideout-navigation at github
    There's also a video demonstrating the library at work.

    EDIT: Here's another library project:
    https://github.com/darvds/RibbonMenu
    Thanks Mr BuBBLs in comments!

    Two more library project:
    https://bitbucket.org/jfeinstein10/slidingmenu/overview
    https://github.com/Gregadeaux/android-fly-in-app-navigation

    If you know any other library projects doing this please leave a comment bellow or at the Google+ page!

    Cyril Mottier has also written about implementing this pattern in his blog. These posts are very much worth reading:
    The making of Prixing #1: Fly-in app menu
    The making of Prixing #2: Swiping the fly-in app menu
    The making of Prixing #3: Polishing the sliding app menu

    See also the Prixing app on the Google Play to try out the side navigation implemented by Cyril.


    Ok After spending 2 days reading about similair problems and how people solved them I finally was able to create the thing I wanted. I was not able to do it with 2 diffrent XML files, but I doubt it is not possible.
    I did encountert some problems tho.
    After the first animation ended, the button was not clickable. This is because the animation shows that everything is moved but it does not update the layout, so the button is still at the position where the animation started. So I had to calculate the new position of the layout.
    I think I read somewhere that this is no longer an issue in 3.0, but correct me if I am wrong
    Another was that when I had my animation finally working the way I wanted my underlaying view did disapear before the animation was finished because I invoked view.setVisabilty(View.GONE);. Now the problem was when I did not invoke that method, the animation just hang for a second and then shooter to the end position of the animation. So I added a empty LinearLayout (can be anything) , Default property on GONE, when the animation starts set it on Visible. when you revert the animation, set it again to gone. after doing this the animation was working the way I wanted.
    And if you are using a Rel, Linear, or any other layout. then you cant stack views in the Z order so you have to use an SurfaceView.
    so heres main.xml
     <?xml version="1.0" encoding="utf-8"?>
    <RelativeLayout xmlns:android="http://schemas.android.com/apk/res/android"
        android:id="@+id/RelativeLayout1"
        android:layout_width="fill_parent"
        android:layout_height="fill_parent"
        android:orientation="vertical" >
    
        <SurfaceView
            android:id="@+id/surfaceView1"
            android:layout_width="fill_parent"
            android:layout_height="fill_parent" />
    
        <RelativeLayout
            android:id="@+id/layout"
            android:layout_width="220dp"
            android:layout_height="fill_parent"
            android:background="#ffee00"
            android:orientation="vertical" >
    
            <LinearLayout
                android:id="@+id/fake_layouy"
                android:layout_width="wrap_content"
                android:layout_height="wrap_content"
                android:orientation="vertical" android:visibility="gone">
            </LinearLayout>
    
            <ListView
                android:id="@+id/listView1"
                android:layout_width="match_parent"
                android:layout_height="wrap_content" >
            </ListView>
        </RelativeLayout>
    
        <RelativeLayout
            android:id="@+id/layoutTwo"
            android:layout_width="fill_parent"
            android:layout_height="fill_parent"
            android:background="#ff00ee"
            android:orientation="vertical">
    
            <LinearLayout
                android:id="@+id/linearLayout1"
                android:layout_width="fill_parent"
                android:layout_height="wrap_content"
                android:layout_alignParentLeft="true"
                android:layout_alignParentTop="true" android:background="#ff0000" android:layout_margin="2dp">
    
                <Button
                    android:id="@+id/button"
                    android:layout_width="50dp"
                    android:layout_height="wrap_content"
                    android:text="slide" />
            </LinearLayout>
    
        </RelativeLayout>
    
    </RelativeLayout>
    heres the java code
        public class MenuAnimationActivity extends Activity {
    
        private Button buttonSwitch;  
        private View subLayout;
        private View topLayout;
        private ListView subViewListView;
        private String listViewDummyContent[]={"Android","iPhone","BlackBerry","AndroidPeople"};
        private Display display;
        private View fakeLayout;
        private AnimationListener AL;
    
        // Values for after the animation
        private int oldLeft;
        private int oldTop;
        private int newleft;
        private int newTop;
        private int screenWidth;    
        private int animToPostion; 
        // TODO change the name of the animToPostion for a better explanation.
    
        private boolean menuOpen = false;
    
            /** Called when the activity is first created. */  
            @Override  
            public void onCreate(Bundle savedInstanceState) {  
                super.onCreate(savedInstanceState);  
                setContentView(R.layout.main);  
    
                buttonSwitch = (Button)findViewById(R.id.button);  
                subLayout = (View) findViewById(R.id.layout);  
                topLayout = (View) findViewById(R.id.layoutTwo);
                subViewListView=(ListView)findViewById(R.id.listView1);
                fakeLayout = (View)findViewById(R.id.fake_layouy);
    
                subViewListView.setAdapter(new ArrayAdapter<String>(this,android.R.layout.simple_list_item_1 , listViewDummyContent));
    
                display =  getWindowManager().getDefaultDisplay();
                screenWidth = display.getWidth();
                int calcAnimationPosition = (screenWidth /3);
    
                // Value where the onTop Layer has to animate
                // also the max width of the layout underneath 
                // Set Layout params for subLayout according to calculation
                animToPostion = screenWidth - calcAnimationPosition;
    
                RelativeLayout.LayoutParams params = new RelativeLayout.LayoutParams(animToPostion, RelativeLayout.LayoutParams.FILL_PARENT);
                subLayout.setLayoutParams(params);
    
                 topLayout.setOnTouchListener(new OnTouchListener() {
    
                    @Override
                    public boolean onTouch(View v, MotionEvent event) {
    
                            if(event.getAction() == MotionEvent.ACTION_DOWN) {
                                if (menuOpen == true) {
                                    animSlideLeft();
                                }
                            }
    
                        return false;
                    }
                });
    
                buttonSwitch.setOnClickListener(new View.OnClickListener() {  
    
                   @Override  
                   public void onClick(View v) { 
                       if(menuOpen == false){    
                           animSlideRight();
                       } else if (menuOpen == true) {
                           animSlideLeft();
                           }
                       }  
                      });  
    
                 AL = new AnimationListener() {
    
                    @Override
                    public void onAnimationStart(Animation animation) {
                        buttonSwitch.setClickable(false);
                        topLayout.setEnabled(false);
                    }           
                    @Override
                    public void onAnimationRepeat(Animation animation) {
                        // TODO Auto-generated method stub
    
                    }               
                    @Override
                    public void onAnimationEnd(Animation animation) {
                        if(menuOpen == true) {
                            Log.d("", "Open");              
                            topLayout.layout(oldLeft, oldTop, oldLeft + topLayout.getMeasuredWidth(), oldTop + topLayout.getMeasuredHeight() );
                            menuOpen = false;
                            buttonSwitch.setClickable(true);
                            topLayout.setEnabled(true);
                        } else if(menuOpen == false) {
                            Log.d("","FALSE");
                            topLayout.layout(newleft, newTop, newleft + topLayout.getMeasuredWidth(), newTop + topLayout.getMeasuredHeight() );                    
                            topLayout.setEnabled(true);
                            menuOpen = true;
                            buttonSwitch.setClickable(true);
                        }
                    }
                };
            } 
    
            public void animSlideRight(){
    
                        fakeLayout.setVisibility(View.VISIBLE);
                    newleft = topLayout.getLeft() + animToPostion;
                    newTop = topLayout.getTop();    
                    TranslateAnimation slideRight = new TranslateAnimation(0,newleft,0,0);
                    slideRight.setDuration(500);   
                    slideRight.setFillEnabled(true);   
                    slideRight.setAnimationListener(AL);    
                    topLayout.startAnimation(slideRight);           
            }
    
            public void animSlideLeft() {
    
                fakeLayout.setVisibility(View.GONE);
                oldLeft = topLayout.getLeft() - animToPostion;
                oldTop = topLayout.getTop();        
                TranslateAnimation slideLeft = new TranslateAnimation(newleft,oldLeft,0,0);
                slideLeft.setDuration(500);   
                slideLeft.setFillEnabled(true);   
                slideLeft.setAnimationListener(AL);    
                topLayout.startAnimation(slideLeft);                
            }
    }  
    I did some extra coding on touching views and stuff.
    And the final result
    before Animation
    enter image description here
    after First Animation
    enter image description here
    And after the second Animation back to the left it states returns as the first Image.
    Al those posts that helped me really deserve some credit but I cant find any of them.
    Edit
    GIT https://bitbucket.org/maikelbollemeijer/sidepanelswitcher