eros theme
CMS .. PAGE >>Home Page
{{block type="customblocks/customblock" alias="root" template="customblocks/customblock.phtml"}}
{{block
 type="catalog/product_list" name="home.catalog.product.list"
alias="products_homepage" template="catalog/product/list.phtml"}}
system>>config>>
------------------------
http://inchoo.net/magento/custom-category-menu-navigation-in-magento/
The result
Et voilà! You should be able to see the navigation on the right column of your page. It’s not exactly the prettiest list, but I trust you’ll be able to style it to suit your needs.
-----------------------------
How to remove right sidebar in magento
|
go to magento admin click on cms home page , click on design now select layout 1 column now save and refresh page
https://gist.github.com/Maksold/3956702 LOCAL.XML ------------------------------------------------------------------------------------------- How to manage home page sidebar blocksHome Page blocks.Home page blocks in Magento are controlled by the Magento administration panel. So all change should be done there.1. Open Magento admin panel 2. Go to CMS > Pages > Home Page   Here are some examples: Popular Tags block
Community Poll block
Newsletter Sign-Up block
Sidebar callout(banner) block
You can change the blocks order or delete any of the blocks editing the XML code. Magento TutorialsMagento. How to manage search. First of all you need to set product Visibility. Go to Admin section-Catalog-Manage Products. Open particular product. In General tab you will find Visibility section. There you should select appropriate option. We recommend you to select Catalog, Search option. In this case product will appear in both catalog and search results. When you select Catalog option product will now show up in search results. We have searched for MX610 Left-Hand Laser Cordless Mouse product. Screenshot of result you can check below. 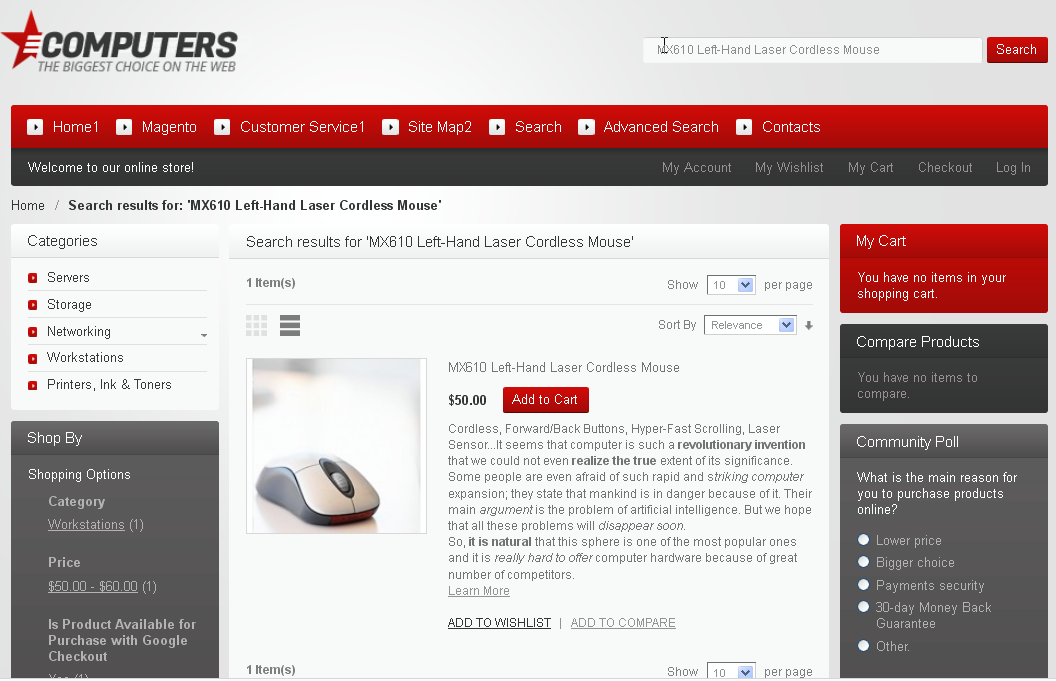 2. In order to enhance search results we can specify Search Terms. Go to Catalog-Search Terms. 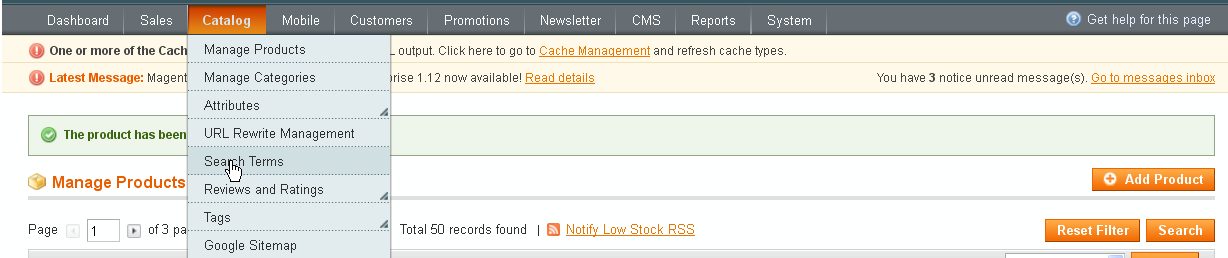 Click on Add New Search Term. There you should specify search query and synonym (optionaly). As synonym we have copied part of product name. It means that set of products can appear in search results. We have entered Best computer Search Query with HP Pavilion Synonym. After that we need to save changes. Screenshot with search term settings you can find below.  Magento : How to add a static CMS block to the side bar (twitter example)[stextbox id="custom" color="ffffff" bcolor="ffffff'" bgcolor="000000" image="null" float="true" width="600"]This is a simple thing to achieve but the questions is asked over and over again so I thought it might worth adding a quick tutorial here. For the sake of an example we will look at how to add your twitter feed to the left hand menu. [/stextbox] Step one.. get the twitter code from here : http://twitter.com/about/resources/widgets/widget_profile Style it to match the colour, size and shape of your theme. Your final code will look something like [php] <script src="http://widgets.twimg.com/j/2/widget.js"></script> <script> new TWTR.Widget({ version: 2, type: ‘profile’, rpp: 8, interval: 6000, width: ‘auto’, height: 200, theme: { shell: { background: ‘#333333′, color: ‘#ffffff’ }, tweets: { background: ‘#000000′, color: ‘#ffffff’, links: ‘#4aed05′ } }, features: { scrollbar: true, loop: false, live: true, hashtags: true, timestamp: true, avatars: false, behavior: ‘all’ } }).render().setUser(‘dx3webs’).start(); </script> [/php] Step Two In Magento Goto CMS > Static Blocks. Create a new block Title: myTwitter Indentifier: twitter Status: Enabled Content: Paste your twitter code in here. Save Step Three Open app/design/frontend/xxxxxx/xxxxxx/layout/catalog.xml Add your static block to the left or right section in [php] <!– Mage_Catalog –> [/php] (near the top of the file) For example to add to the left sidebar.. (Having already removed that damned dog call out) [php] <reference name="left"> <block type="cms/block" name="myTwitter" > <action method="setBlockId"><block_id>twitter</block_id></action> </block> </reference> [/php] Bingo you have a new block showing your twitter updates. Needless to say you can add any html you like.
Choose from a range of magento tutorials:
|
..................................................
Meaning of numbers in col-md-4 , col-xs-1 , col-lg-2
Ignoring the letters (xs, sm, md, lg) for now, I'll start with just the numbers...- the numbers (1-12) represent a portion of the total width of any div
- all divs are divided into 12 columns
- so,
col-*-6spans 6 of 12 columns (half the width),col-*-12spans 12 of 12 columns (the entire width), etc
<div class="col-xs-6">Column 1</div>
<div class="col-xs-6">Column 2</div><div class="col-xs-2">Column 1</div>
<div class="col-xs-6">Column 2</div>
<div class="col-xs-4">Column 3</div>.row, which is another story altogether).You can also nest columns within columns, (best with a
.row wrapper around them) such as:<div class="col-xs-6">
<div class="row">
<div class="col-xs-4">Column 1-a</div>
<div class="col-xs-8">Column 1-b</div>
</div>
</div>
<div class="col-xs-6">
<div class="row">
<div class="col-xs-2">Column 2-a</div>
<div class="col-xs-10">Column 2-b</div>
</div>
</div>.col class has 15px padding on either side, you should usually wrap nested columns in a .row,
which has -15px margins. This avoids duplicating the padding, and keeps
the content lined up between nested and non-nested col classes.-- You didn't specifically ask about the
xs, sm, md, lg usage, but they go hand-in-hand so I can't help but touch on it... In short, they are used to define at which screen size that class should apply:
- xs = extra small screens (mobile phones)
- sm = small screens (tablets)
- md = medium screens (some desktops)
- lg = large screens (remaining desktops)
-------------------------
Menu Bar is not showing up in Eros theme for magento
This is the solution for displaying Menu in Eros theme
De-coment line 70 of file header.phtml in
app/design/frontend/fed/default/template/page/html.
<?php echo $this->getChildHtml(‘topMenu’); ?>
only delete // not echo
<?php echo $this->getChildHtml(‘topMenu’); ?>
uncomment on line no 70 for showing menu bar.
How to create a custom theme in Magento
Directory structure for themes in custom design package (CE)
The first part of creating your custom theme is to create your directory structure.
1
2
3
4
5
6
7
8
| app + design + frontend + your_new_package_name (package) + your_new_theme_name (theme in your new package) + layout + template + locale |
1
2
3
4
5
6
7
| skin + frontend + your_new_package_name (package) + your_new_theme_name (theme in your new package) + css + images + js |
Create new files
Finally, add some boiler plate to local.xml, so that custom.css and custom_js.js will get included:
1
2
3
4
5
6
7
8
9
10
11
12
13
14
15
16
17
18
19
| <?xml version="1.0" encoding="UTF-8"?><layout> <default> <!-- Remove callouts and rarely used stuff --> <remove name="right.poll"/> <remove name="right.permanent.callout"/> <remove name="left.permanent.callout"/> <remove name="paypal.partner.right.logo"/> <!-- add the local stylesheet --> <reference name="head"> <action method="addCss"><stylesheet>css/custom.css</stylesheet></action> <action method="addItem"><type>skin_js</type><name>js/custom_js.js</name></action> </reference> </default></layout> |
- A single layout file, named local.xml, where all layout updates are placed.
- no layout files with the same name as any layout file in the base theme.
- no css files with the same name as any css file in the default skin.
- no .phtml template files, except for those that were modified to support the new theme. (Usually this number will be very small.)
Applying your new package and theme to your website
Once you have created the skeleton directory structure to hold your new design package and theme, you will need to apply it to your Magento store so that you can see changes as you work. To see your new theme as you develop it, be sure to apply it to your development website using the Magento Admin Panel. On Admin section, go to System -> Configuration -> Design tab. In the Package panel, set the Current Package Name to whatever you have named <your_package_name>. In the Themes panel, set the Default theme to default if you are creating a new theme in CE or to whatever you have named <your_theme_name>. Look image below. Applying your new package and theme to your website
Understanding layout XML files
Introduction
Using xml instead of other methods (JSON, .ini files, include / require functions) allows us to change many aspects on our page without manually changing the .phtml files. This chapter refers to our default theme so after changing the theme (as we have done above) the paths will also change.Layout / page structure
The core Layout is defined by page.xml which is located in /app/design/frontend/base/default/layout/page.xml. There are two large tasks layout carries out. First it defines the visual layout for your store. By default Magento uses a 3-column layout, so it defines use of 3columns.phtml (Located in your template/page/ folder):
1
| <block type="page/html" name="root" output="toHtml" template="page/3columns.phtml"> |
1
2
3
4
5
6
| <reference name="root"> <action method="setTemplate"><template>page/2columns-right.phtml</template> <!-- Mark root page block that template is applied --> <action method="setIsHandle"><applied>1</applied></action></action></reference> |
Reference name values/attributes:
-
root - we will change it mostly to set up another .phtml file as a root template ex. (1column.phtml , 2columns-left.phtml ,2columns-right.phtml etc.).
-
head - as this reffers to our <HEAD> section on page, we will use this reference name to reflect our changes in this section.
-
top.menu - defines our content for top menu section.
-
left - defines our content for left column.
-
right - as above but for right column.
-
content - defines blocks placed in main content of our page.
- footer - defines blocks placed in footer area.
1
2
3
4
5
6
7
8
9
10
11
12
13
14
15
16
17
18
19
20
21
22
23
24
25
26
27
28
29
30
31
32
33
34
35
| <?xml version="1.0" encoding="UTF-8"?><layout><!-- Category default layout --> <catalog_category_default> <reference name="root"> <action method="setTemplate"><template>page/2columns-right.phtml</template></action> </reference> <reference name="head"> </reference> <reference name="header"> </reference> <reference name="left"> </reference> <reference name="right"> <block type="catalog/navigation" name="category.list" before="-" template="catalog/navigation/category_list.phtml"/> </reference> <reference name="content"> </reference> <reference name="footer"> </reference> </catalog_category_default></layout> |
Understanding .phtml files
Introduction
Phtml files are template files that handle the output to browser. They are nothing more than html files with nested php tags. We use them to style our page and the look of our site. Changing .phtml files requires basic knowledge about XHTML, CSS and understanding how to use PHP functions on a page. IMPORTANT: Before changing a .phtml file, it has to be copied from the base (or default) theme, into the new theme. When Magento finds one of these files in your new theme, it will ignore the .phtml file from the base theme, so it is important to ONLY copy over the files that you absolutely need to modify. This will minimize errors when updating Magento. The additional effort required to individually copy the 4-5 files you eventually modify will more than make up for itself the first time Magento needs to be updated.Editing Columns, Footer, and Header in MagentoRight Column BlockThe first problem was that there was a default Facebook block setup linking to the creators of the themes Facebook site. Since I am deploying this on a customers site, naturally I didn’t want this. However, I tried to search everywhere within the backend admin panel, and couldn’t remove it. Finally, I found the solution was as easy as removing a few lines of code from the 2columns-right.phtml file.For your theme, you’ll want to browse to the folder: /app/design/frontend/<interface name>/<theme name>/template/page/ Inside this folder, you have a few more folders, but there are also a few *.phtml files. According to the template you’re using (1 column, 2 column, 3 columns), and the appropriate side column you want to edit (right or left), you should open this *.phtml file, and find the code that corresponds to the block you want to remove. Your best bet for removing some code is to remove everything inside (and including) the <div><content to remove></div> tags. Header and Footer *.phtmlBrowsing now to: /app/design/frontend/<interface name>/<theme name>/template/page/html you will find the both the header.phtml and the footer.phtml files. | |
---------------------------------------------
add context in html
In the default header.phtml there is this line:
Option 1. In case you want to add a simple text that does not depend on the page or user and you want to add it after the welcome message you can add this piece of code in your layout file: |
http://excellencemagentoblog.com/blog/2011/09/22/magento-part2-series-layouts/
...................................................................................................................................................................
No comments:
Post a Comment