Features of Genymotion:
1.Fastest Android emulator on the planet.2.Do your simultanous automatic tests on unlimited virtual appliances .
3.Directly launch Genymotion from your Eclipse and Android Studio platforms.
4.It has Open GL acceleration ,multiscreen and full screen display.
Steps to Setup Genymotion Android Emulator in Windows OS:
1.Go to http://www.genymotion.com/ and sign up.2.After logging in download genymotion for Windows 32/64 bits from the following link.
https://cloud.genymotion.com/page/launchpad/download/
3.Download and install virtualbox for linux from the following link.
https://www.virtualbox.org/wiki/Downloads
4.Now run the the downloaded genymotion-1.1.0.exe and install the Genymotion on your PC.
5.Then launch Genymotion and login with your Username and Password.
6.Select Add to create a new virtual device, then select a device from the list and click Add.
 |
8.When the download is completed select next from the window.
9.Then you will be asked to enter a name for the downloaded Genymotion virtual device. Enter a name and select create and the click finish.
10.Now the virtual device will be listed in “Your virtual devices” in the home screen.
11. Then select play to start your virtual device.For the first time it asks to configure sdk path for using ADB , select the sdk path and you will be booted to Android home screen.
Here are some of the screenshots of Genymotion Android emulator running in my 64 bit Windows 8
Configure Genymotion with Eclipse IDE:
1.Open Eclipse and select Help->Install New Software.2.Enter the URL http://plugins.genymotion.com/eclipse and hit Enter
3.Genymobile will be shown, select it and click next.
4.Genymotion Eclipse Plugin will be downloaded and installed.
5.Now restart Eclipse IDE the plugin will be active.
6.Now you can run your apps developed in eclipse in Genymotion Android Emulator.
To define your HTTP proxy settings, check the following options:
- Use HTTP Proxy: enables the Genymotion application to use a proxy when connecting to the Genymotion website.
You must set your HTTP proxy address and port in the corresponding fields. - Use authentication: enables proxy authentication.
You must enter your proxy username and password in the corresponding fields.
VirtualBox
From the VirtualBox tab, you can define the storage location of your virtual devices.

In the Virtual devices field, set where to store Genymotion virtual devices by clicking Browse.

In the Virtual devices field, set where to store Genymotion virtual devices by clicking Browse.
The virtual device path must be an absolute path.
ADB
By default, Genymotion uses its own Android tools. From the ADB tab, you can configure Genymotion to use specific Android tools (from the Android SDK).

Use Genymotion Android tools (default) is the option enabled by default.
If you wish to use specific Android tools:

Use Genymotion Android tools (default) is the option enabled by default.
If you wish to use specific Android tools:
- Download Android Developer Tools (ADT) from the ADT Download page.
- Extract the archive files in the folder of your choice.
- Check Use custom Android SDK tools.
- In the Android SDK field, set the path to the Android SDK folder by clicking Browse.
- Click OK.
adt-bundle\sdk\platform-tools is not a valid value.Misc
Fr |
| App running in Genymotion from Eclipse |
Configure Genymotion with Android Studio:
1.Download genymotion-idea-plugin-20130716.jar plugin from the link http://plugins.genymotion.com/plugins/idea/1.0.1/genymotion-idea-plugin-20130716.jar2.Open Android Studio IDE
3.Open File->Settings and the IDE Settings->Plugins
4.Choose Install plugin from disk and choose the downloaded genymotion-idea-plugin-20130716.jar
5.Now Apply Changes
6.In Android Studio select Run->Edit configurations
7.Select Target device as Show chooser dialog.
8.Now you can test your Application in Genymotion by choosing Genymotion from the Choose Device dialog while running your Application.
Enjoy
---------------------------
Solving Genymotion “unable to connect to your virtual device” Error
So I know you are here because you get this error message while starting a Genymotion Device.First you should go check your firewall settings as suggested in the Genymotion FAQ. Other than that, if the problem still persist, 9/10 it’s the problem of your Host-only adapter settings. Here’s how to correctly set it.
1. Open VirtualBox, Go to File-> Preferences…
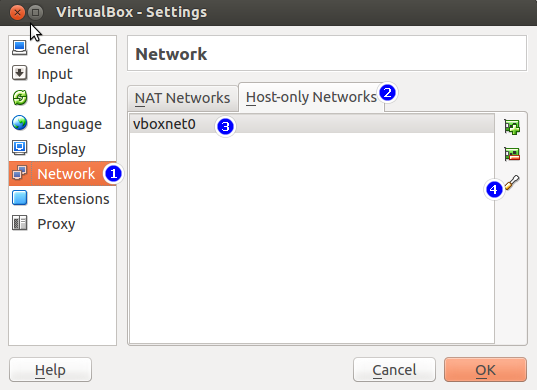
2. Network -> Host-only Networks, you should see 1 item (if there’s none, create one)
3. Follow this settings
4. Select your VM -> Settings -> Network -> Disable the Network Adapter (It will be re-configured by Genymotion)
5. Start the Android Image again in Genymotion UI (not in Virtualbox), It should work now!
You can ask me for help if it doesn’t work for you, leave your comment down below and I’ll be replying you soon.
--------------------------------------
If you start running Genymotion, you might encounter the “The Genymotion Virtual device could not obtain an IP address” error, as shown below:

To solve this:
go to VirutalBox, select File > Preferences

Select Network tab, then Host-only Networks Tab, then select vboxnet0, then edit button on the right toolbar

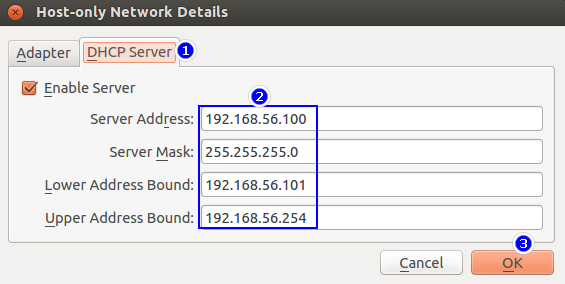
In the Network details, key-in as below highlighted in blue, then clcik the 2nd Tab “DHCP Server”

Type in the information as highlighted in blue as follows:

Restart the Genymotion, by clicking the play button again. Yeah~~~~


No comments:
Post a Comment